
Layflat InDesign Specs
Indesign Specs for our Layflat Photo Books
InDesign Specs
Creating layflat books can be tricky. This page is dedicated to helping you create your Layflat books with Adobe InDesign!
Looking For Downloadable Templates?
COMING SOON!
Designing for Hinged Layflat
Due to the measurements required to create 2 page spreads that flow across the gutter, our Hinged Layflat products require a bit of extra attention to the margins. Below we'll go over how to set your book up for success!
Setting Up Your Document
The best way to set up your document is:
- "File" > "New" > "Document"
- Select the following in the “New Document” window:
- number of pages
- check "facing pages"
- enter in the final page size of your project plus .25". (For example, if you're creating an 8.5x11", set the width to 8.75" and the heigh to 11.25")
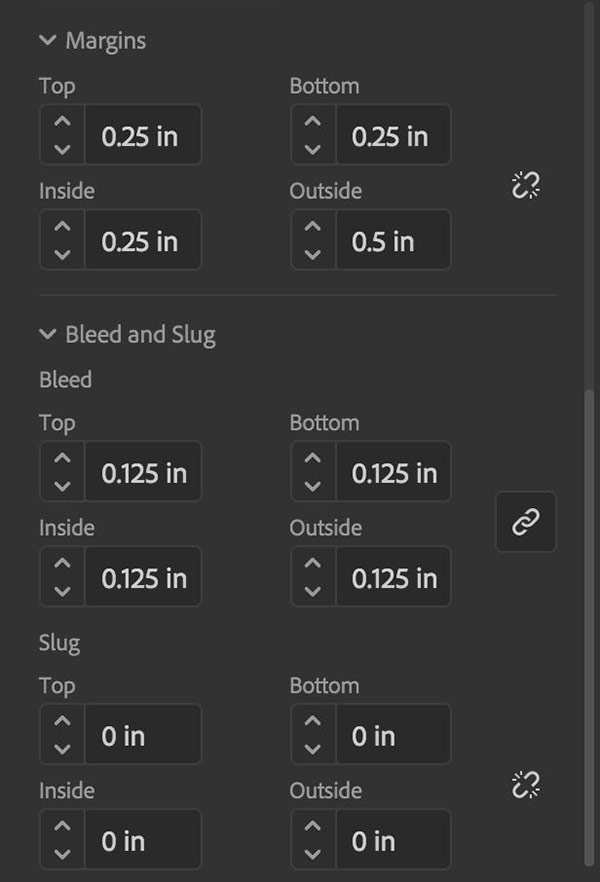
- set margins for top, bottom and inside to: 1/4" or .25"
- set margins for outside to: 1/2" or .5" Note: Setting the outside margin differently will result in potential cropping issues when designing your book
- set bleed to: 1/8" or .125"
- Start designing! Make sure to keep your margins in mind, and ensure no important content ends up being trimmed off in production.
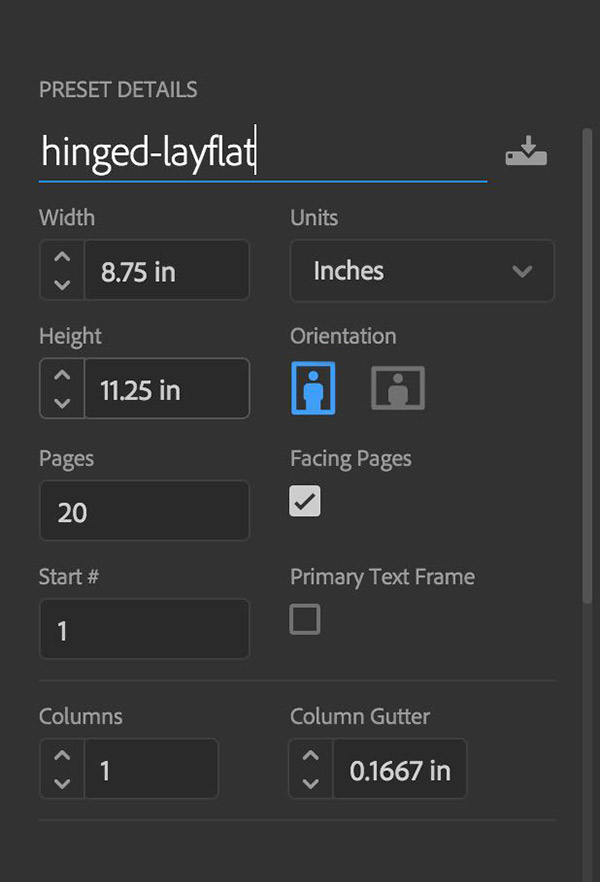
Please Note: If you're designing 2-page spreads, keep in mind you will need to start designing these spreads on an even number page. If you start your 2-page spreads on an odd number, the pagination of your project will be off and the spreads will print incorrectly.
Designing for Seamless Layflat
To ensure you have a "seamless" 2-page spread that spans across the gutter of the book, you'll want to be very particular about your bleed. Below we'll go over how to ensure your file is Seamless ready!
Setting Up Your Document
The best way to set up your document is:
- "File" > "New" > "Document"
- Select the following in the “New Document” window:
- number of pages
- check "facing pages"
- enter in the final page size of your project plus .25". (For example, if you're creating an 8.5x11", set the width to 8.75" and the heigh to 11.25")
- set margins to: 1/4" or .25"
- set bleed to: 1/8" or .125" Note: Setting bleed differently will potentially cause issues with the alignment of your 2-page spreads.
- Start designing! Make sure to keep your margins in mind, and ensure no important content ends up being trimmed off in production.
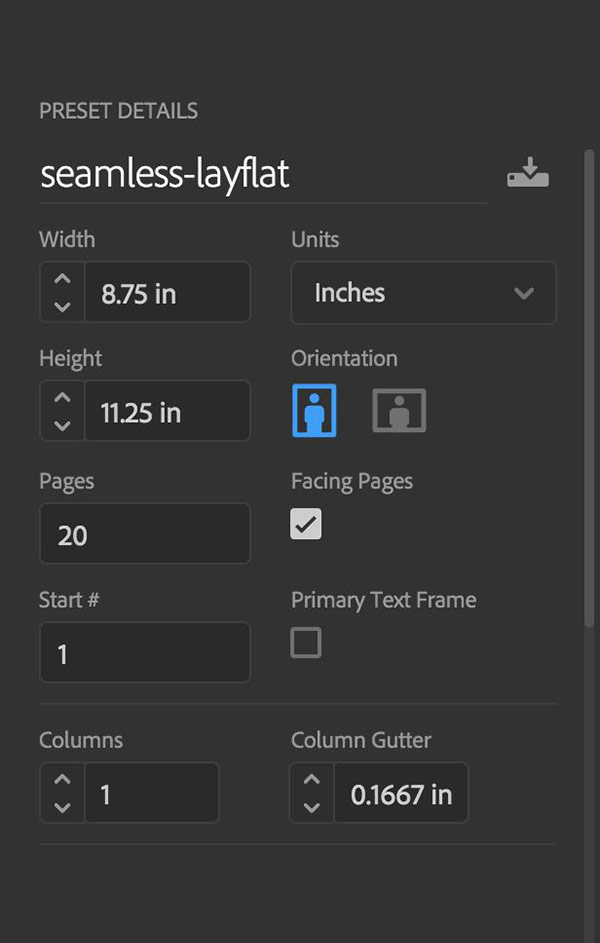

Please Note: If you're designing 2-page spreads, keep in mind you will need to start designing these spreads on an even number page. If you start your 2-page spreads on an odd number, the pagination of your project will be off and the spreads will print incorrectly.
A Few More FAQs
InDesign’s default measurement unit is picked as (sixths of an inch). In order to change that setting to inches you will need to, first, make sure no document is open. If a document is open the changes will only occur in that document.
On a Mac Go to the InDesign menu and under “Preferences” choose “Units & Increments” look for the “Points/ Inch:” box, scroll down and select “PostScript (72 pts/inch) to change your measurement to inches.
On a PC Click the “Preference” which is located under the “Edit Menu”, go to the “Units” tab on the right and select Inches.
Don’t worry! The most common reason our site states that there are no products available is due to your file being uploaded in a size that we don’t offer. With books created in InDesign, this typically means that you saved out your file with the “Spreads” button selected during Export, instead of the “Pages” button.
All you’ll need to do is go back into InDesign, Export that file following the directions on our Adobe InDesign Help page and re-upload to our site!
This is called a Transposed Bleed. InDesign automatically formats your document with Transposed Bleeds to ensure your book has that nice “finished” look to it.
These transposed bleeds are very helpful in ensuring that your 2-page spreads align properly during the printing process.
Comments
Size for Full-Bleed Image for 8x8 Seamless Layflat Photo Album?