macOS Photos Help
Documentation for using the PrestoPhoto macOS App as an Apple Photos Extension.
Start your Project
Make sure you have the latest version of PrestoPhoto downloaded and installed either from the macOS App Store or directly from our website. If you are using Version 1.1 of the app, you will not be able to follow along with this tutorial.
The video contains no sound, and is for visual reference only
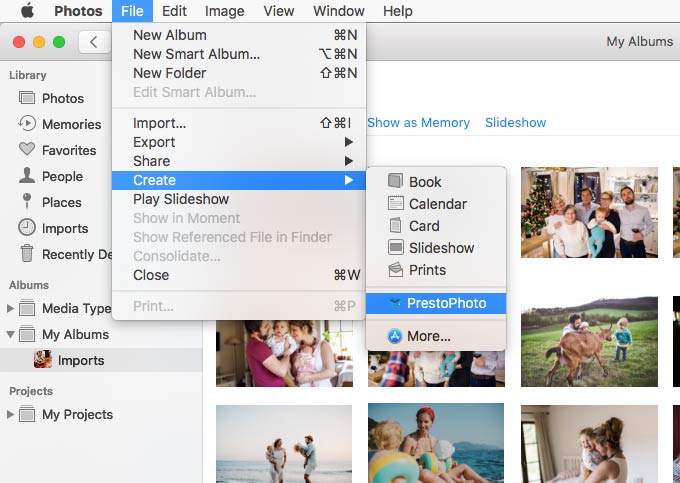
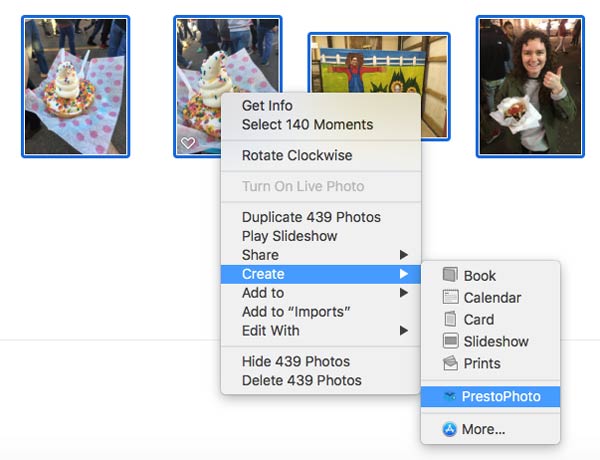
You'll want to start by selecting your photos for your photo book project. Once selected, right click on any photo, go to Create Book PrestoPhoto.
The video contains no sound, and is for visual reference only
You'll want to start by selecting your photos for your photo book project. Once selected, right click on any photo, go to down to Create, then find and click PrestoPhoto. You'll need to pick what type of project you are wanting to create next (Photo Book, Print Set, Wall Art, Photo Gift) before moving on. See below for two methods you can use to create a new project:
You'll have a few options here, select your orientation (Landscape, Square, or Portrait), and then select the size you would like your photo book to be. With 24 sizes to choose from, we're sure we have the right one for you.
Then select your template, number of pages you want to start in your book, if you'd like images to be placed on template pages for you, and the maximum number of images you would like per page.

Page Count

When starting your photo book, you can choose your books Page Count from the start if you know your book is bigger than 20 pages. If you leave this option as is upon creation, you can add more pages as needed inside your project.
Max Images Per Page

Limits the number of image boxes on a template page during Autoflow. For example, with our default of 4 images, the initial flow of your book will never choose a template page that has more than 4 images on a page. You can still choose any template when editing your book after Autoflow is complete.
Autoflow Images

With Autoflow Images selected, our app will place images in templates for you in the order that they were taken based off of EXIF time metadata. If unchecked, it will create a new blank book with the template that was selected.
Smart Placement

Utilizing Apple’s Core ML framework, our Smart Placement option will optimize image placement during Autoflow. Instead of placing 3 nearly identical images, Smart Placement will choose the best image based off of multiple photo EXIF metadata points and machine learning technologies. This is processed locally on your computer, so your data is secure on your own device.
Latest Features!
Lightroom Integration
Integrate your Lightroom account into our PrestoPhoto app. You can now access your Lightroom images to create custom photo books!
The video contains no sound, and is for visual reference only
You'll want to start by selecting your photos for your photo book project. Once selected, right click on any photo, go to Create Book PrestoPhoto Create Book Click "+" Icon Lightroom Icon Sign In.
The video contains sound! Make sure to unmute.
The latest release of the PrestoPhoto App introduceds Advanced Template Styles, a brand new color picker interface, as well as lots of stabilty and performance improvements!
Advanced Styling Templates

Snapshots
Simple Borders
Simple Shots
Still using Version 1.1 or the Apple Pages portion of the app? Check out our Apple Pages Help Page for more information.
Getting Around the App
App Basics
After selecting your product options, you'll end up in the design portion of our app. On this page, you'll see your books pages in the left hand side box, all of the photos in your photo book project in the bottom scrolling box, and to the right you will see your current page you are editing.
The first two pages that show in the page setup preview are the Front Cover (FC) and the Back Cover (BC). From there, the book starts with Page 1 on the right side, as most all books that we print have a endleaf that goes on the left of Page 1.
Back to Help TopicsThe video contains no sound, and is for visual reference only
Photos Drawer
Below is the photos drawer, where all of the photos you selected for your project will show up. All of the images that are grayed out are currently placed on pages, making it easier to tell if you've already used an image or not. The page number it's on is in the bottom left hand corner of the thumbnail.
Back to Help TopicsThe video contains no sound, and is for visual reference only
Page Layout
In the largest area of the window is the current selected page layout. This is where most of the work is done. You can zoom in and out of this working area with the sliding bar to the bottom right of the working area.
Back to Help TopicsThe video contains no sound, and is for visual reference only
Adjust Working Size of Areas
You can adjust all of the working area sizes in the app. Hover over the window separators until the Resize  cursor is displayed to make your working areas smaller and bigger to better fit your current task.
The video contains no sound, and is for visual reference only
Create a Book without Autofill
If you'd like to choose your photos placement in your book, you can choose a template and deselect Autoflow Images and then click Select Template to enter your book.
Back to Help TopicsThe video contains no sound, and is for visual reference only
Time Filter
Looking through hundreds of photos can become disorienting when you are trying to put together a photo book. Organize your photos with our Time Filter function. We divide your photos up into organized sets by date, and that way you can pick and choose photos from different events or holidays in a flash. You can also toggle whether or not photos that are already in use are still in your photo tray, or show all of your photos in your project.
Back to Help TopicsThe video contains no sound, and is for visual reference only
Log In or Sign Up
In order to purchase your product, you'll have to login using the app. You can do this in the top right hand corner of the app by clicking on the ![]() icon. You'll be asked for your PrestoPhoto login information for your PrestoPhoto account (this is not the same login and password as your Apple ID). If you have not created a PrestoPhoto account, enter your desired email and password into the Email and Password fields and click the Register button.
icon. You'll be asked for your PrestoPhoto login information for your PrestoPhoto account (this is not the same login and password as your Apple ID). If you have not created a PrestoPhoto account, enter your desired email and password into the Email and Password fields and click the Register button.
Once you are registered and logged in, the previous icon will be replaced with this icon: ![]() and your first initial attached to your PrestoPhoto account in the middle.
and your first initial attached to your PrestoPhoto account in the middle.
The video contains no sound, and is for visual reference only
Photos and Images
Placing Images
To place an image on a page with predefined image boxes, select your desired image from your Photo Tray and drag it to the empty space. You can replace images that have already been placed by following this same process, just drag the new image in and it will replace the previous one.
Back to Help TopicsThe video contains no sound, and is for visual reference only
Removing Images
To remove an image on a page within predefined image boxes, you can either select the image you want to remove with Edit Layout mode off and click the Delete key, or select your desired image from your Photo Tray and drag it to the image you want to replace.
Back to Help TopicsThe video contains no sound, and is for visual reference only
Adjust Image Size and Crop
To adjust how your image is displayed in the current layout, just click on the image. You can hold your click and move the image around in the image box, or you can adjust the slider that appears above the page layout to hide the slider again and bring back the icon to add Images and Text
Back to Help TopicsThe video contains no sound, and is for visual reference only
Add Image Boxes
When you click Add Image, a new image box will be placed on your current page layout. To edit the size and placement of that image box, make sure you are in Edit Layout mode.
Back to Help TopicsThe video contains no sound, and is for visual reference only
Delete Image Boxes
To delete an image from your page, enter Edit Layout mode, select the image you want to delete, and hit the Delete key on your keyboard.
Back to Help TopicsThe video contains no sound, and is for visual reference only
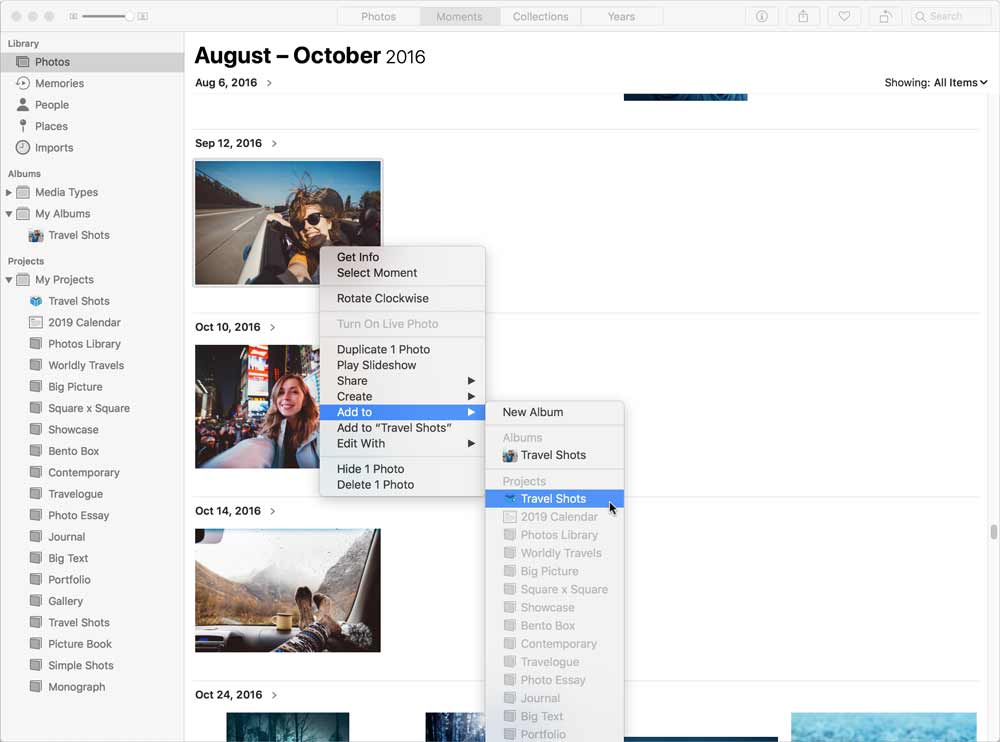
Add more Photos to a Photo Book Project
If you need to add more photos to your project or started your project without photos selected, go back to your Photo Library or select a Photo Album, select the photos you want in your project. You have two options to choose from: either drag the photos to your project or right click and go to Add To and select your project.
Back to Help TopicsThe video contains no sound, and is for visual reference only
Edit your Photo
We have integration with Apple's photo editing in app for macOS 10.14 and up. Just select your photo (you can click on the photo on the page to quick select it from your photo tray), click the Edit button that appears below the photo, and the photo editor comes up. Once you've edited the photo to your liking, click the Done button and you will return to your book. Wait just a moment for the adjustments to the photo to be reflected in your photo book.
You can edit photo's in 10.13, but not in app. Just go back to your photo library, select the photo, double click to view the photo by itself zoomed in, and click Edit in the top right hand corner.
Rotate your Photo
Rotating photos is really easy too, just access the Edit mode and in the top right hand corner and click on the  Rotate icon until it is the correct orientation. Once you're done, click the Done
The video contains no sound, and is for visual reference only
Backlit Images
A backlit image is any image where the main light source (the Sun, lamps, any form of lighting) is behind the subject of the photo being taken. One of the biggest culprits are shots of people with sunsets, for example. They look pretty in real life, but they wreak havoc on photos. Images that have heavy shadows or are dark tend to print much darker than you'd expect. Unlike the human eye, printers can not perceive "shadows", but rather reproduce these as the color black, resulting in a loss of detail in images with shadows.
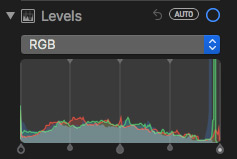
One thing you can do is to edit your photo's Levels, start by clicking the Edit button beneath the photo you need to edit. To the right hand column you'll see a slew of photo editing options, look for the Levels section. Take the middle Gray slider and adjust in closer to the left hand side Black slider. This should help your photos greatly in terms of seeing the main subject of the photo. Your background may lighten dramatically when editing your photo, but the subject of the photo is the most important part.
You may adjust some of the other knobs in the levels editor as needed and see if it helps your image, as every photo is unique, with a unique editing to get the optimal photo.
Alternatively, you can also adjust the brightness, or as Apple labels it the Light of the photo and see if that helps as well. With Photos, you can edit your photo as much as you want and revert the photo back to the original image if you went too far or don't like the way the edits look too, so don't worry about making changes.
Back to Help TopicsThe video contains no sound, and is for visual reference only

Image before editing for back lighting
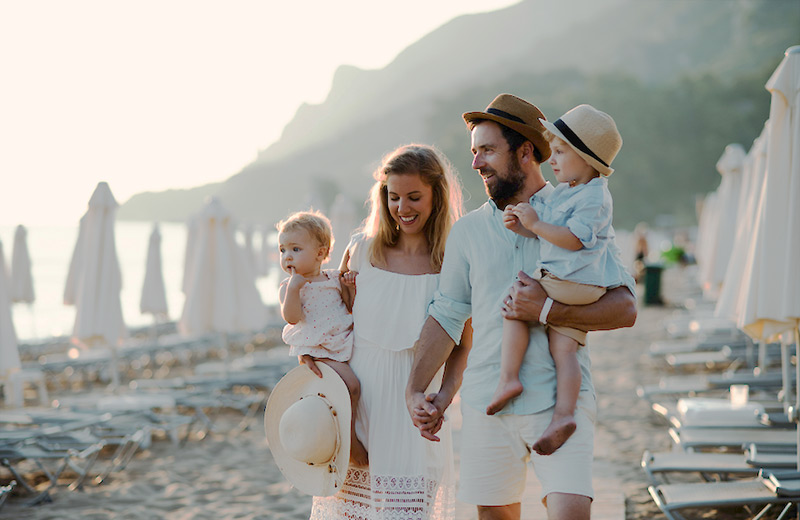
Image after editing for back lighting
Store iCloud Photos Locally
For the most seamless experience with the PrestoPhoto App to work when you don't have access to an internet connection, and if you have the available storage on your Mac, we suggest that you store your iCloud photos locally. Go to the top left hand menu for Photos and click Photos Preferences. In your preferences, choose the iCloud tab and select Download Originals to this Mac to store original copies of your photos locally.
Back to Help TopicsThe video contains no sound, and is for visual reference only
Text
Add Text
Above the page you are currently editing is a button that you can click to add page elements:
- Add Image
- Add Title
- Add Caption
- Add Paragraph
When you click Add Title, Add Caption, or Add Paragraph, a new text box will be added to your current page layout. Title will bring up a large font size, Caption will bring up a medium font size, and Paragraph will bring up a small font size. Double click on the box to type text and bring up the text editing options. When you are finished, you may want to click on the gray background to get access to the icon again.
Back to Help TopicsThe video contains no sound, and is for visual reference only
Move Text
To move a text box, just click on the text you want to move and a bounding box will appear. You can now resize the box shape to reflow the text inside the box. You can also move the text box around the page by clicking and then dragging the box to your desired location.
Back to Help TopicsThe video contains no sound, and is for visual reference only
Delete Text
To delete a text box, enter Edit Layout mode, click on the text box you wish to delete to select it, and press the Delete key on your keyboard.
Back to Help TopicsThe video contains no sound, and is for visual reference only
Format Text
The PrestoPhoto App has tons of options for text customization within it's text editor. It should be similar to certain Mac text editors you've used in other programs. Here are some of the features:
Back to Help TopicsThe video contains no sound, and is for visual reference only
Main Font Menu

Menu Breakdown:
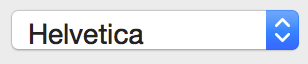 - This first dropdown controls the base style of font, and is a list of all fonts currently installed on your computer
 - You can choose a font style here if your chosen font has other styles available
 - This option will change the font color of the selected text
 - Controls the background color of the text (the default with the red diagonal line means that it is transparent)
 - This area controls your font size in Points, you can use the arrows to incriment up and down by 1 point or enter your desired point size manually
 - Changes your selected font either Bold or Italic
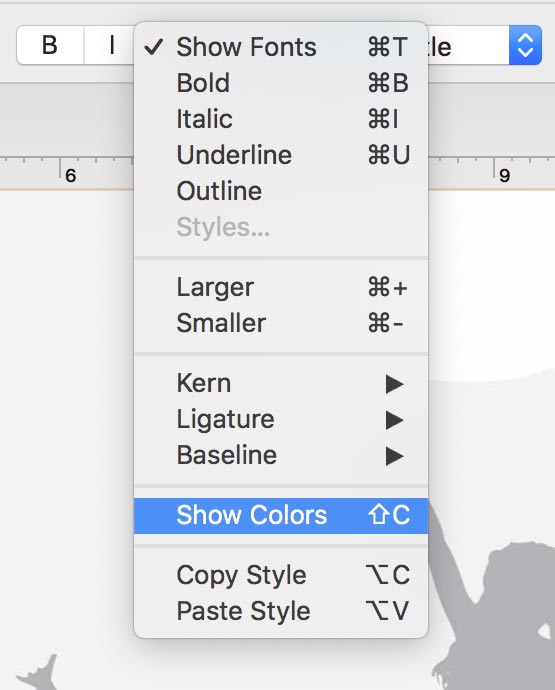
 - Displays a secondary font menu With more in-depth text formatting options
 - Choose between our three base font styles, Title, Body, and Caption
 - Pressing this button with one of our base styles selected will overwrite that style with the current style of the selected font
 - Another way to add styles onto your current selected text (Bold, Underline, Etc.)
 - Flush Left, Flush Right, Centered, or Fully Justify your selected text
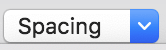 - Adjust the Line Spacing of your selected text
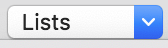 - Apply a List Style like bullets or numbering to your text
Secondary Font Menu
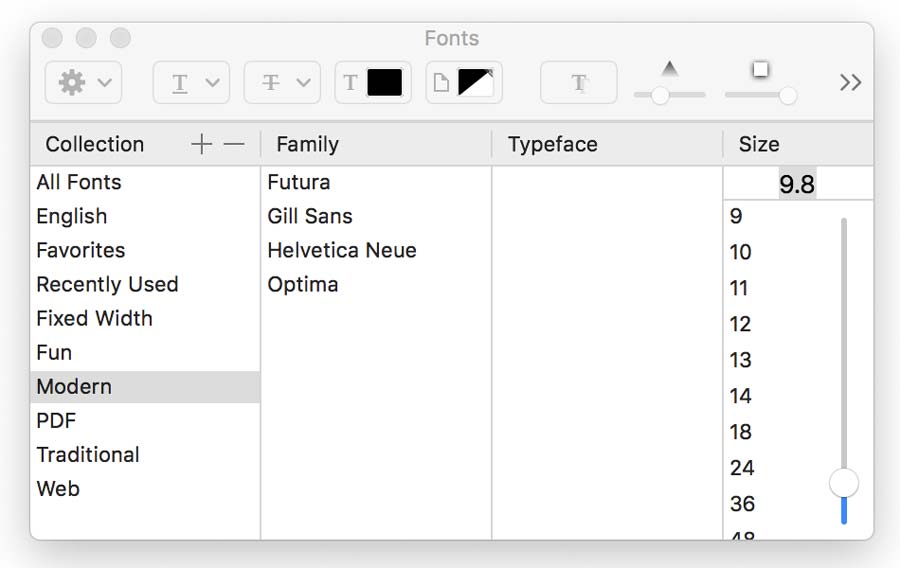
- Show Fonts - Brings up a much more indepth Font Selection Window from your Font Book:
- Bold - Bolds Selected text
- Italic - Italicizes Selected text
- Underline - Underlines text
- Outline - Outlines text, leaving interior empty
- Larger - Increases font size by 1 point
- Smaller - Decreases font size by 1 point
- Kern - This section adjusts the kerning of your text (space between letters)
- Use Default - Resets to the standard Kerning for each letter
- Use None - Applies a standard equal kerning to each letter (very similar to default)
- Tighten - Reduces the space between letters
- Loosen - Increases the space between letters
- Ligature - This section controls ligatures within your text (when two or more typographical glyphs/characters are represented as one glyph/character)
- Use Default - Uses the default settings for Ligatures with your specific font selection
- Use None - Turns off the use of Ligatures in your text
- Use All - Uses all ligatures available for your font

- Baseline - Adjusts the baseline (the imaginary line that letters "sit" on) of your text
- Use Default -
- Superscript - Selected text will be moved up, ie 222
- Subscript - Selected text will be lowered, ie 222
- Raise - Raises the selected text slightly up from it's current baseline
- Lower - Lowers the text slightly from it's current baseline
- Show Colors - Brings up the color selection menu for fonts
- Copy Style - Copies the style of the current selected text
- Paste Style - Pastes the copied style to the current selected text
Change Text Color
To change your text color, highlight and select the text which color you'd like to change and click on the A in the text options field above and select your desired color. For more options, click on the color wheel in the bottom right hand corner.
Back to Help TopicsThe video contains no sound, and is for visual reference only
Add Spine Text
To add spine text to your book, click on the Edit icon on the Buy Now in the upper right hand corner of the Buy Now page after you have uploaded your book. On the next page that loads, select option 2, Cover, to get to your cover settings.Scroll to the bottom of this page and select the tab labeled Spine Text. Insert your desired spine text, then click Update Cover in the bottom right hand corner. You'll be able to see a preview of your spine text once it is done generating. Once you are satisfied, click Buy Now in the upper right hand corner to get back to the Buy Now page to finish your purchase.
Back to Help TopicsThe video contains no sound, and is for visual reference only
Pages
Dust Jackets
New projects will default to a hardcover book with a dust jacket template, or select the  Hardcover option from the dropdown. To create dust jacket flaps place an image on the predefined image boxes located under the main covers. The project can be changed to a softcover option without dust jacket flaps, but any designed content will be lost in changing from a hard to soft cover format. Just click on the
  Softcover option from the dropdown menu.
The video contains no sound, and is for visual reference only
Adding Pages
Above your book pages preview to the left is a button  to add pages to your book and a to remove them. The will add new pages after your currently selected page one at a time.
The video contains no sound, and is for visual reference only
Adding Multiple Pages
To add multiple pages at once, navigate to the Templates tray and to the right hand side of the tray select Choose Theme. Confirm the dialog box to continue to the theme change area. Instead of changing your theme with Replace in the top bar, you are going to switch your mode to Append, which will only add the number of pages you tell it to to the end of your current book. Enter the number of pages, and choose the template theme you want to use for the new pages, and when you're done select Select Template.
Back to Help TopicsThe video contains no sound, and is for visual reference only
Adding Two Page Spreads
To add a two page spread to your photo book layout, you can either click on the Add Page button and select Spread Page or right click on a thumbnail page on the left side and select Insert spread page. This will insert a spread after the page you have selected, and depending on where it is in the book it may add blank pages to keep pagination correct.
The video contains no sound, and is for visual reference only
Deleting Pages
The icon will ask to confirm if you want to delete your current selected page before it deletes it.
Back to Help TopicsThe video contains no sound, and is for visual reference only
Duplicating Pages
The icon will duplicate the current selected template pages design, great for reusing a custom made template design throughout your book.
Back to Help TopicsThe video contains no sound, and is for visual reference only
Rearrange your Pages
To rearrange pages, select the page you want to move in the left hand box, and drag it to the new place in the book you would like it placed.
Back to Help TopicsThe video contains no sound, and is for visual reference only
Layout
Edit Layout
Click the Edit Layout button to gain control over your image boxes and text boxes. You can make them bigger, smaller, a different size orientation, you can even rotate them.
Back to Help TopicsThe video contains no sound, and is for visual reference only
Flip Layout
You can also flip your page designs with the Flip Vertical and Flip Horizontal tools to better suit your layout needs.
Back to Help TopicsThe video contains no sound, and is for visual reference only
Choose a Background Color
In the tool bar below your current page is the Background Color button, where you can change the background color of your current page you are editing.
Back to Help TopicsThe video contains no sound, and is for visual reference only
Match Background Colors
To change your background color, go to the page that you want match and select the Background Color tab at the lower right of the editor. When you select the color tab the previously used color will be in the color tray. You can color match by also clicking on the color wheel in the bottom right hand corner and using the eyedropper.
Back to Help TopicsThe video contains no sound, and is for visual reference only
Add a Background Image
To add a background image to a page, you you'll need click the and select Add Image. Click the Stretch Vertical  and Stretch Horizontal
  buttons to make it the height and width of the page, then place your background image. When you're done, you can right click the image, then select Arrange Send to Back. This will send the full size image to the back below all of the other images placed on the page, but above the background color of the page.
The video contains no sound, and is for visual reference only
Templates
Apply Template Pages
Navigate to the Templates tray and then Click on a template page design for it to be applied to your current page layout.
Back to Help TopicsThe video contains no sound, and is for visual reference only
Adding Borders
Our app now offers the option to apply template pages with borders.There are select templates that allow for borders, those include Simple Borders, Stock Book, SquarexSquare and Simple Shots. Navigate to the Templates tray and then Click on a template page with borders to be applied to your current page layout.
Back to Help TopicsThe video contains no sound, and is for visual reference only
Switch Between Template Themes
To switch between different themes, click on the dropdown in the Templates tray to see options in another template. You can also select All to view all templates at once.
Back to Help TopicsThe video contains no sound, and is for visual reference only
Sorting Template Pages
Select the page you want a template applied to, so that it is showing in the right hand box. Click the Templates button beside the pages below your page layout view and select your prefered template options to find the right template.
Back to Help TopicsThe video contains no sound, and is for visual reference only
Auto-Select Mode for Templates
If you know what photos you want on a page but don't know what template, just use our Auto-Select button in the template tools tray below the page canvas. When you turn this mode on with a page with manually placed photos, it will automatically find one of our template that best fits the photos on the page. Drag a new image to the canvas to find a new template with your new photo included.
Back to Help TopicsThe video contains no sound, and is for visual reference only
Utilities
Undo and Redo
If you need to undo an action on a page, you can go to the menu above and select Edit Undo to undo your last actions on the current page. If you go back too far, below is the option to Redo which you can redo something you've undone. When you switch between pages, this starts fresh so you won't undo an action made on another page you aren't currently on.
Back to Help Topics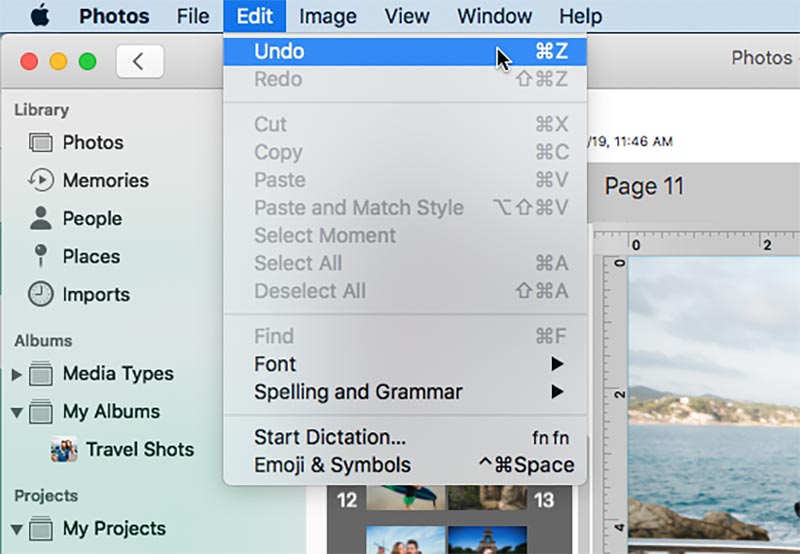
Change your project name
To rename your project title, double click on the title at the top of your screen with your project open, and type in your new project title. Press Enter when you are done to de-select the project title.
Back to Help TopicsThe video contains no sound, and is for visual reference only
Refresh Your Project
If your project pages and thumbnails aren't updated to reflect your most recent changes, you can click on the Refresh button in the top left corner to regenerate your entire project. Depending on the size of your project, it could take a moment to fully refresh, so be patient until the refresh has finished.
Back to Help TopicsThe video contains no sound, and is for visual reference only
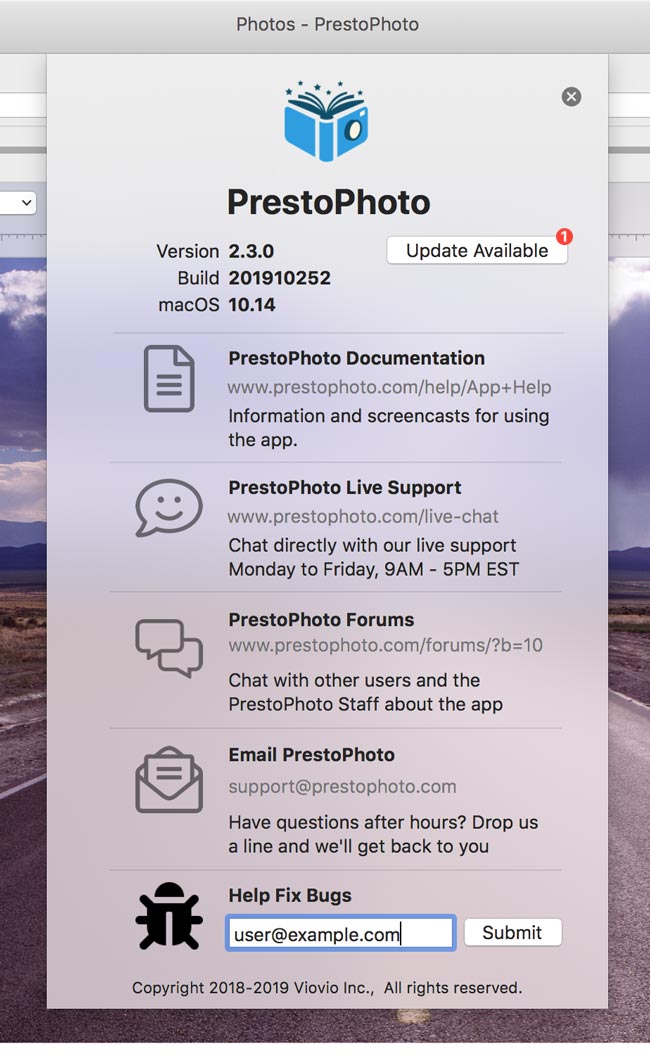
Find your App Version Number
If you want to find out if you have the most recent version of the app, click on the in the top right hand corner and a window will pop down. This window has information on which version of the app you are using, your current macOS version, and some helpful links and information.
Back to Help TopicsThe video contains no sound, and is for visual reference only
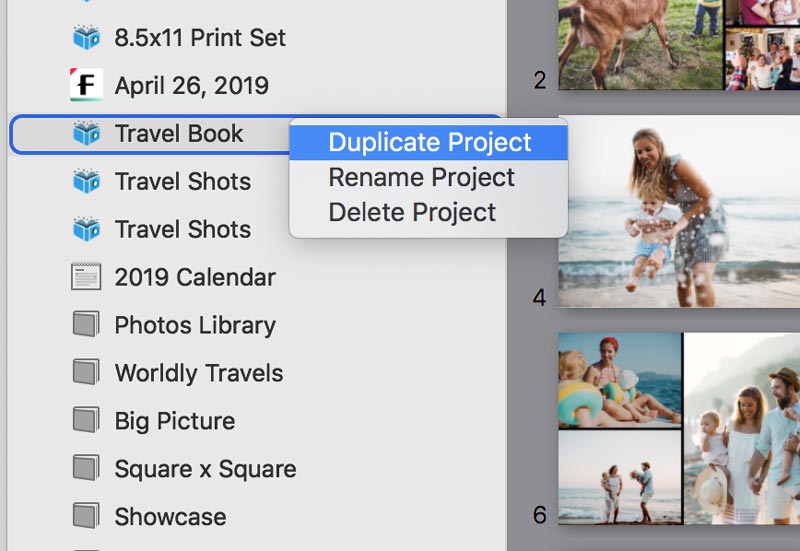
Duplicate a Project
To duplicate a PrestoPhoto project, find your project on the left hand bar of Photos, then right click or hold control + click on the project title. A dropdown menu will show up, click Duplicate Project. A new project will show up on the left hand side bar, you may have to scroll down to it if you have a lot of projects in Photos to see it.
Allow PrestoPhoto to create projects in Photos
The video contains no sound, and is for visual reference only
If PrestoPhoto is not showing up in Apple Photos for project creation, you may have to approve it for use as a Third-Party extension. To check and see if it is approved, go to your System Preferences by clicking on the icon in the top left-hand corner of your computer screen, then selecting System Preferences. Find and click on Extensions, and you will see a list of all extensions for your Mac. You may have to click on Photo Projects in the left hand menu to narrow it down if you have a lot of extensions. Make sure PrestoPhoto is clicked and now you can use the PrestoPhoto app in Apple Photos.
Back to Help TopicsScreenshare with PrestoPhoto
Our Customer Support Staff may ask to screenshare with you to better help you solve your issues with the app. We use a piece of software called Zoho that enables us to see the problem on your end, as well as trouble shoot the situation. A customer service representative will send you a link to join in the chat, either copy and paste the link into your preferred web browser or click on the link to start your screenshare session. You will download a file called JoinMac.dmg Double click on that file and double click on the Zoho icon labeled Join.

From there, a popup window will show up asking if you are sure you want to open Join. Click Open, then a pop up window in the bottom left corner. Click Join and the screenshare will start instantly. Some instructions will then show up on how to set up your Accessibility settings to allow us to take control of your Mac to help you troubleshoot the issue.
The video contains no sound, and is for visual reference only
System Accessibility settings for Screenshare
To set up your mac with macOS 10.14 Mojave and up to allow us to control your mac to help troubleshoot your issue, open your System Preferences from your Applications folder or go to the in the top left corner of your screen and select System Preferences under About This Mac. Go to Security and Privacy, log in to make changes to your Privacy preferences, find Zoho in the list towards the bottom, and check it to allow access. We can now take control of your cursor during this screen sharing session to help guide you through your issue.
When the session is complete, make sure to go back into your Security and Privacy settings and de-select Zoho while not in use.
The video contains no sound, and is for visual reference only
Back to Help TopicsSign Up for Bug Reporting
Wanna help with the development of the PrestoPhoto with the App? Sign up for our bug reporting program! If you experience a crash in the App, we'll be able to find the crash and better able to problem solve the issue.
All you have to do is click on the in the top right hand corner of the app, and at the bottom of the pop-up will be a heading Help Fix Bugs and a place to insert your email address. That's it! After doing so, if you experience a crash within the program we may contact you for information about what you were doing when the crash happened, to better get to the cause of the issue.
Convert Old Photos Projects
If you have a project created with the Apple Photos first party extension and would like to make changes to it after updating to macOS 10.14 and up, you'll need to convert the project to the PrestoPhoto App.
Start by selecting the project from the My Projects section in the bottom left hand corner. Then go to File Create Book PrestoPhoto, select your Photo Book Size (we suggest sticking with the size it was originally designed at), and we'll convert your project.
This feature is currently in Beta, so there will be a few changes depending on your original theme chosen for your photo book. We currently do not convert your Apple Photo's projects background colors, background textures, any picture frames or borders, and any graphics that were in the original book including Maps. Currently we do import two pages spreads and Dust Jacket content with our 3.0 release, please update your version of PrestoPhoto to 3.0 to enjoy this feature.
The video contains no sound, and is for visual reference only
Calendars
Create a Calendar
Creating a Photo Calendar is very similar to creating a Photo Book. Select your photos for the calendar, then either right click or hold the Control key and click on one of your selected photos. In the pop-up menu that appears, go to Create Calendar ![]() PrestoPhoto. Choose between Landscape or Square photo calendars, and then the size of the calendar you want to create.
PrestoPhoto. Choose between Landscape or Square photo calendars, and then the size of the calendar you want to create.
Now you need to select some options for your Calendar, like the Template, page count, max images per page, and whether you want to autoflow images or use smart placement. You can also choose between your Calendar Grid Style, choosing either Classic in a Sunday start format, or our Sheer calendar grid in a Sunday or Monday start format. Click Select Template and you can begin customizing your calendar with template page designs, custom text, and background colors. When ready, click Buy Now and place your order.
Back to Help TopicsThe video contains no sound, and is for visual reference only
Adding Dates and Birthdays
Holidays can be placed within your calendar at the simple push of a button. If you have your contacts synced to your Mac with birthdays, those can also be added to your project. When you are ready to add the dates, bring your cursor to the birthday cake and click. Select if you want Birthdays, Holidays, or both and then hit “Apply” to add the dates throughout the calendar.
Back to Help TopicsThe video contains no sound, and is for visual reference only
Back to Help TopicsCalendar Images on Dates
You can add images into individual date boxes within the calendar! Mark someone's special day with a custom photo calendar.
Sync your contacts to apply birthdays to the app calendar. With a simple click, your calendar can have holidays and integrated birthdays applied throughout the year.
Back to Help Topics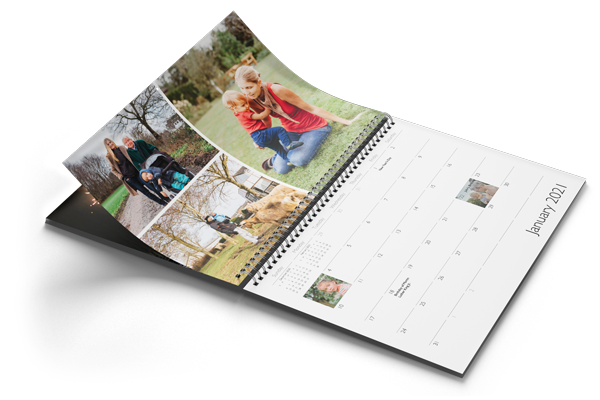
Prints
Create a Print Set
To create a print set, remember that our minimum print order is 4. If you make a print set and want 4 prints of the same photo, you'll want to drag and drop the image on each of the 4 pages in the print set. You'll have two different options for print types:
Back to Help TopicsThe video contains no sound, and is for visual reference only

Classic photo print backing with FujiFilm repeated in a pattern, with a higher gloss finish on the front photo print and matte on the back

Wall Art
Create a Wall Decor/Art Print
Creating Wall Art is easy. Select your photo or photos for your wall art, then either right click or hold the Control key and click on your selected photo(s). In the pop-up menu that displays, select Create Wall Decor ![]() PrestoPhoto. You're given a few options for your wall art material (Acrylic, Ultra Gloss Metal, True Canvas, Faux Canvas, and Brushed Metal), then select your orientation (Landscape, Portrait, or Square), then the size of the wall art you wish to create.
PrestoPhoto. You're given a few options for your wall art material (Acrylic, Ultra Gloss Metal, True Canvas, Faux Canvas, and Brushed Metal), then select your orientation (Landscape, Portrait, or Square), then the size of the wall art you wish to create.
At this point, you can apply the photo you wish to get printed and place it on your project, template page designs, custom text, and background colors. When ready, click Buy Now and place your order.
Back to Help TopicsThe video contains no sound, and is for visual reference only
Photo Gifts
Create a Photo Gift (Coffee Mug)
To create a Photo Gift, start by selecting a photo or photos for your photo gift, then either right click or hold the Control key and click on your selected photo(s). In the dropdown menu that is shown, choose Create Other ![]() PrestoPhoto. You're given a few options for Photo Gifts (Custom Drinkware [including Coffee Mugs], Custom Ornaments, Custom Stationery, and other options are in Custom Photo Gifts [playing cards, puzzles, and mousepads]), then choose the specific product you wish to create.
PrestoPhoto. You're given a few options for Photo Gifts (Custom Drinkware [including Coffee Mugs], Custom Ornaments, Custom Stationery, and other options are in Custom Photo Gifts [playing cards, puzzles, and mousepads]), then choose the specific product you wish to create.
From there, you can apply the photo you wish to get printed and place it on your project, template page designs, custom text, and background colors. When ready, click Buy Now and place your order.
Back to Help TopicsThe video contains no sound, and is for visual reference only
Purchasing and Export
Buy your Project
To purchase your project, click on the Buy Now button in the top right hand corner of the window. You project will then be uploaded to the website, and will show you all of the available purchase options for your project. You can continue editing your book by clicking Edit.
Back to Help TopicsThe video contains no sound, and is for visual reference only
Export a Photo Book PDF
When you are ready, you can export a PDF to upload to our website for print. In the top right hand corner beside Buy Now, there is an Export button which will export your project to PDF for purchase. Just choose your file name and where you would like to save the PDF, and click Save.
You also have the option of exporting individual files of each page and the cover as either PNG files or JPG files.
Back to Help TopicsThe video contains no sound, and is for visual reference only
Preview Your Photo Book
Before clicking Add to Cart, make sure to preview your book using Flip Preview, located right above the cover of your photo book.
Back to Help TopicsThe video contains no sound, and is for visual reference only
Troubleshooting
Don't see the PrestoPhoto App in Apple Photos
First, verify which version of macOS you are using, and that you are using macOS 10.13 High Sierra or above. If you are using macOS 10.12 Sierra, you will only be able to use the Apple Pages portion of our App.
Next, verify that you are allowing the PrestoPhoto App to create Apple Photo's projects. Open your System Preferences, find and click the Extensions section, then navigate to the Photo Projects tab. Make sure the PrestoPhoto App has a checkmark in this tab, otherwise you won't see it in Apple Photos.
Still having issues? Contact us and we'll see if we can figure out the issue together. Please include the version of the App you are using, the version of macOS you are using, and where you installed the App from (macOS App Store or direct download) along with any other pertinent information related to your specific case.
Back to Help Topics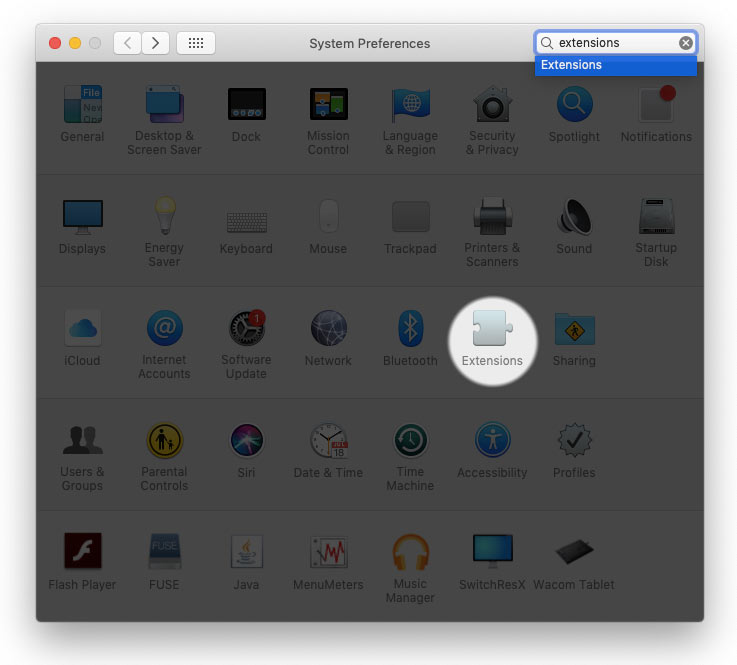

Contact Us
If you're stuck or have an issue, you can send us an email or start a thread on our PrestoPhoto App forum
PrestoPhoto macOS App Forum