
Pro Tips For Designing Your Photo Book Cover
Learn to pro tips to make your photo book print-ready!

By William Boggs
Introduction To Designing Your Photo Book Cover
For starters, make sure you check out our Help page on book binding and covers!
One of our most popular design programs is Adobe InDesign. Interested in trying it out? You can get a 1 week free trial of Adobe CC.
Consider This When Designing Your Photo Book Cover In A PDF Creator
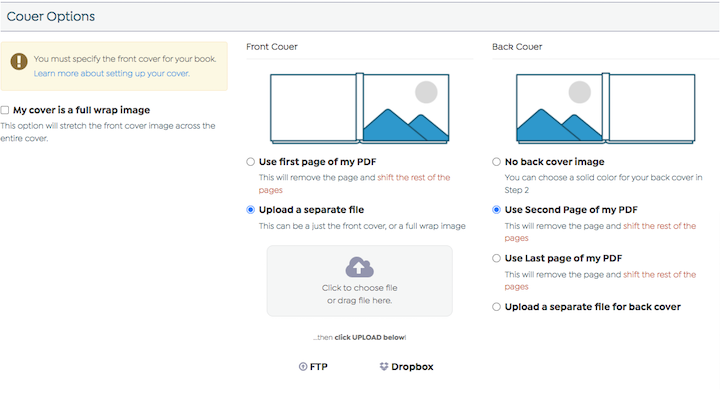
When designing your photo book cover, consider the options that will be available when you upload your project file. You’ll notice in the screenshot below that your cover upload options include: My cover is a full wrap image, Use first page of my PDF, Upload a separate file, No back cover image, Use Second Page of my PDF, or Upload a separate file for back cover.
Additionally, consider how you want your photo book to be bound (view the below options): will you be printing hardcover or softcover, or wire-o? Each of these affects your photo book cover design’s spine. Softcover books with only a few pages may not have a large enough spine to print onto, and the same could apply to some hardcover books. Wire-o options will not have a spine design. When considering your binding options, also consider what options are available to you based on your page count and project size. You can find details on each product’s specified page requirements here by selecting the product you are interested in from the menu on the right and scrolling to product specifications to view page minimums and page maximums.
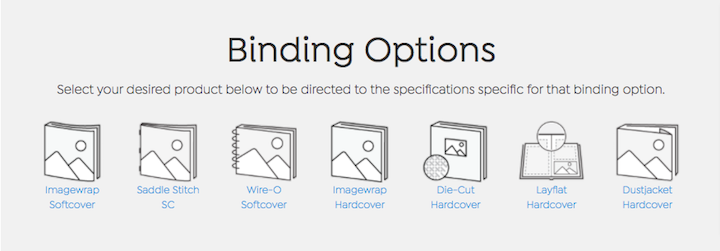
Photo Book Cover Design
Full Wrap Photo Book Cover
A full wrap cover design is a design in which only 1 creative work spans across the entirety of both the front and back covers of the book, from edge to edge.
You should create and upload a full wrap cover design without spine text, utilizing our spine text tool after you’ve uploaded your design for optimal alignment and aesthetic (see Designing The Spine... below).
Two or Three Piece Photo Book Cover
If you want to have a separate image or design for the front and back covers, each, use this option! Here, you can use either the first and second pages of your PDF or the first and last pages of your PDF as the cover images. Then, simply use our spine text tool to create your spine. This makes designing your photo book cover simple and easy!
Designing The Spine Of Your Photo Book In The PrestoPhoto Online Designer
If you are using the PrestoPhoto online designer to design your photo book and cover, you can find the spine text tool by clicking Cover Preview. This is located towards the top of the project assembly pane (which is on the left side of the editor).
The reason we recommend this is that the spine may not align properly if you attempt to create the spine’s design in your own design program. For example if you estimate the width of your spine to be .5” but the book actually ends up being .4”, then your spine design will overlap the edges of the actual spine and run over into your front and/or back cover. Using our spine text tool ensures your spine will be sized and placed correctly! See the images below for a visual representation.

The above image shows 4 identical books (with the same page count and content), printed in various bindings and paper types – thus resulting in varying thicknesses and spine widths. Having seen how drastically book thickness / spine width can vary, you can see why we recommend our spine editor. Here's a visual representation (below) to elaborate further.

In this image, we have marked the expected spine width in a darker shade of red with solid lines and the actual spine width is marked in a lighter red with dashed lines. Had the design actually had a transparent red design on the spine, you can see how that would spill over past the actual edge and onto the front and back covers.
Additional Tips
Avoid placing any valuable or important content close to the edge of your cover creative content, as edges may be cropped off during the printing process – plus it generally just looks better to give your content some “white space” or room to breathe!
Note that the “spine” only includes the edge which will (typically) have text on it – it does not include the part of the front or back cover between the spine and the crease. The area between the spine and the crease is still part of the cover.

William Boggs
William is a professional photographer, filmmaker, and marketer. When he's not working at PrestoPhoto, he's utilizing his talents in other creative ways and helping small businesses grow! Learn more about him on his website at Boggs Creative or follow him on Instagram at @whboggs