
Affinity Publisher
Looking to print your book designed with Affinity Publisher? PrestoPhoto can help, with 24 different book sizes to choose from and over 100 printing options, including layflat!
Learn how to use Affinity Publisher with PrestoPhoto to design amazing photo books for print
Already designed and exported your Photo Book?
Upload your PDFSerif is finally releasing Affinity Publisher, which is shaping up to be an amazing alternative to InDesign, allowing for the design of gorgeous photo books, portfolios, photo albums, nearly any project you'd like to design for a fraction of the price.
We'll go into how to set up a book for print for PrestoPhoto, from how to set up your files color spaces to what size to make your pages. We'll throw in a few helpful tips and tricks we've found on the way for making amazing books with Affinity Publisher.
You'll want to go over to the Affinity Publisher page and purchase the program if you haven't already. Currently competitively priced at $50, the same as the rest of their software line (Affinity Photos and Affinity Designer), Affinity Publisher is a potential Adobe InDesign replacement (or Quark if you still use it!).
All the information included in this post relates to the currently released beta, but if there are any major changes we will be sure to update any related information.
Set your photo book size in Affinity Publisher
Once you open Affinity Publisher, you'll want to start a new file. You can create an infinite amount of different sizes of different sizes, but if you are printing with PrestoPhoto you'll have to choose from our 24 different sizes of photo books. With all of our interior page sizes, add a quarter of an inch (.25" or 1/4 inch) to each size under the Layout tab when creating a new document. For example, with our 11"x8.5" sized photo books, you would set your project to 11.25"x8.75".
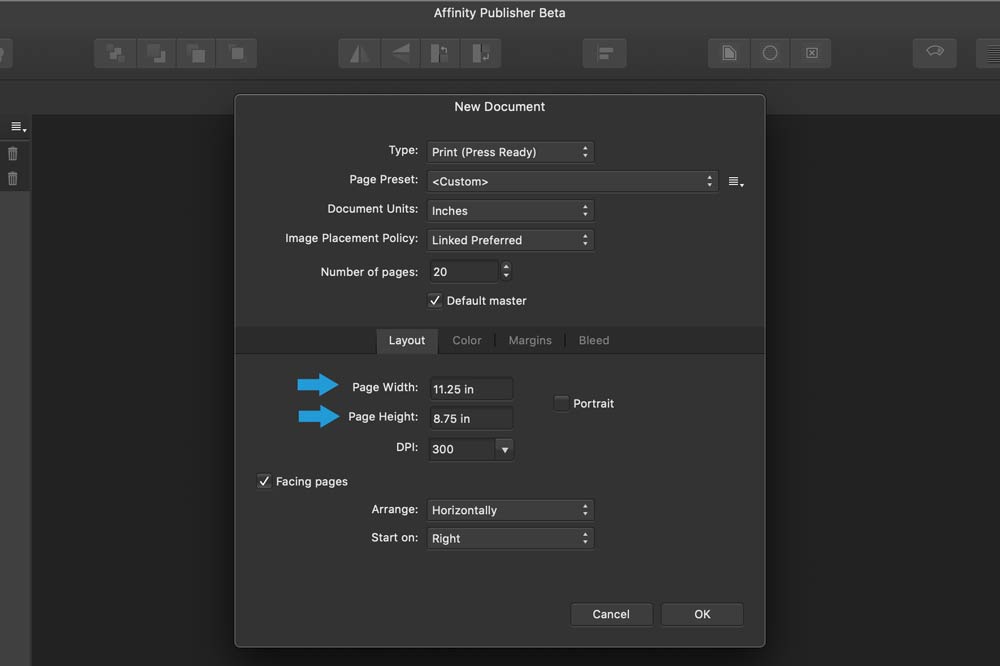
You'll also see that DPI is set to 300 at default, and it should stay that way if you are printing with PrestoPhoto. 300 DPI is a print standard for most printers, including us.
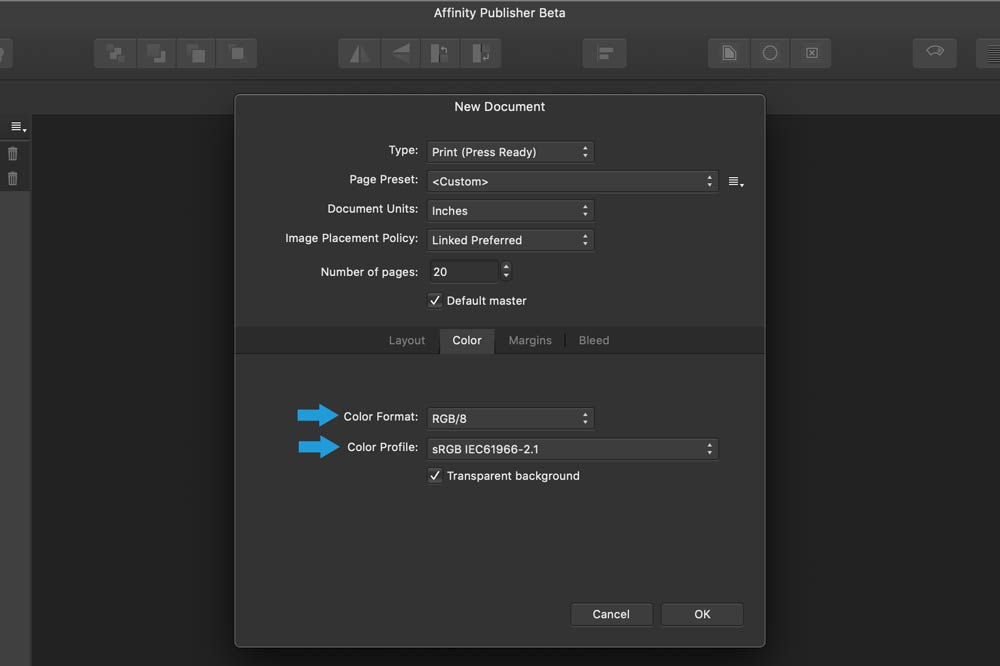
Color Settings
Next go to the color (or 'colour' as they say in Affinity Publisher) settings tab, for printing with PrestoPhoto, we recommend RGB/8 for your Color Format, and for your Color Profile select sRGB IEC61966-2.1.
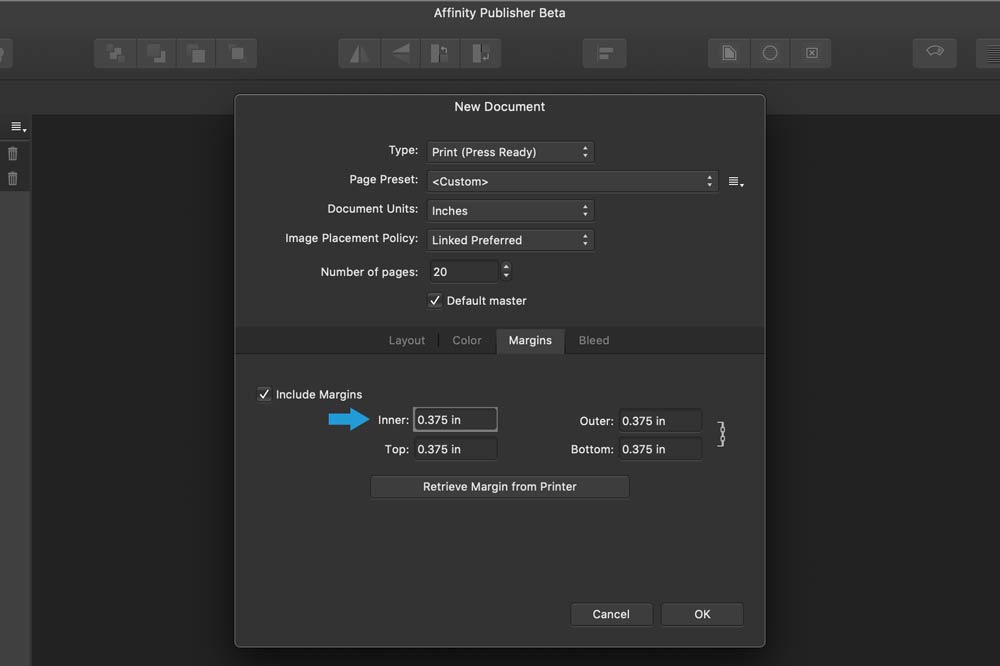
Margins and Bleed
Now we want to set the margin, which we refer to as the safety margin. Anything on the interior of the margin will be safe from cropping when the book is published. Anything outside of this line has a chance of being cropped during the production of the book. If you have any important information that you would never want cropped off, you will want to make sure it's inside of this margin. When printing with PrestoPhoto, we suggest a margin of .375" on all sides. If you need any more information, check out our Cropping and Bleed help page for more info.
Cover Margin Settings
The cover margins vary depending on if you are printing a hardcover photo book or a softcover photo book. If you don't know how you're going to print your photo book before you make it, it's best to design for hardcover so you have the versatility to print either way.
- For hardcover photo books, it's best to design with a 1" margin on all sides to make sure no important information is cropped off or lost in the turn in.
- For softcover photo books, it's the same as a safety margin for the interior pages, .375" on all sides.
For the bleed settings for all covers, you still want to set it up for .125" on all sides like with the interior.

Exporting your PDF
When exporting your final PDF for print, go to File -> Export, select PDF from the file options above. Select PDF (for print) and for the dropdown for Area, select All Pages instead of 'All Spreads' which is initially selected. The 'All Spreads' option exports a 2 page spread as a single page in the PDF, and we cannot process those PDF's for print.

Why Margin and Bleed are Important
 Safety Margin Guides shown in Red above page design
 How the design will be printed in a photo book
Above is a example of why margin is so important when it comes to setting up your book for print, especially if you are new to designing books. It might look right when designing it in Affinity on the screen, but you have to account for how it will be cropped during the production of the book. In the bottom right, the page number 5 is completely cropped off, parts of some of the text that fully showed up in the preview gets cropped on the right, and some of the title text gets cropped off, even though all of it showed in the preview properly.
 Safety Margin Guides shown in Red above page design
 How the design will be printed in a photo book
The example above illustrates how a book will look if you design within the safety margin. Everything important makes it to print, and nothing is cropped awkward or uncomfortably close to the edge of the page.
Margins are just as important, if not more important for the covers, hardcovers especially. Check out the example below of what your cover might look like in Publisher versus what it will look like when we print it. Just because you can see all of the print copy on the screen doesn't mean you will when it goes to print! In these photos, the blue box is the actual margin box that should be set up in Affinity Publisher, by default it's that color blue.
Ignoring Hardcover Safety Margin
 How it looks in Affinity Publisher
 How it looks when it's printed as a Hardcover
Following Hardcover Safety Margin
 How it looks in Affinity Publisher
 How it looks when it's printed as a Hardcover
In the second example where all text copy is in the safety margin, everything comes out on the front cover as expected. Print design doesn't have to be scary, just have a healthy respect for margins and bleeds and you'll be fine.
FAQ: Frequently Asked Questions about Affinity Publisher and PrestoPhoto
Is Affinity Publisher compatible with InDesign files?
As of this moment, there is no way to import InDesign files (.idml) within Affinity Publisher. There has been mentions that support may be there in the future, but as of the writing of this help page, it has yet to be implemented.
How do I enter Spine Text into my photo book design?
The easiest and most error proof way to enter spine text would be during our PDF Upload process, specifically on Step 2 in the Cover Options settings. Here you can enter spine text on the top, center, or bottom of the spine, or in a combination of all of those places.
All Hardcover books may have spine text, but softcover books must be over 35 pages in length to have spine text.
We strongly discourage including your spine in your cover file. Paper size and cover dimensions vary greatly which makes calculating spine width difficult and we cannot guarantee that the spine you create will print perfectly. There is a high chance that it will fold over the cover. For this reason, we will not reprint a book with a custom spine.
Whats the minimum/maximum page count I would want to make a book?
We tend to suggest a minimum of 20 pages for book design, but you can get away with less if you need to. For the maximum, we like books to end by 300 pages mostly for most books, and some books can't get very large at all (our Saddle Stitch 8.5"x11" books for example max out at 60 pages). Check out our Product Catalog and look at the specific product's page you want to order to get more information on the minimum and maximum page length for your desired product, especially if you're going over 60 pages.
Need more help with Affinity Publisher?
If you need a little extra help moving from Adobe InDesign to Affinity Publisher, or if this is the first time using a desktop publishing program like this, Affinity has help video's for Publisher to learn the ropes.
Ready to print your photo book?
Have you finished your book and need to get it printed? Presto Photo has you covered! Just click the button below and start uploading your photo book pdf for print.
Upload your PDF
Comments
Cover Pages for Seamless Layflat