
Adobe Photoshop
Preparing a graphics heavy book for printing using Photoshop
Photoshop® Book Printing
We make printing your book easy. Just upload your book and print!

Step A: Page Setup
Start by determining the size of the document you need to create. View the Product Catalog and review paper-type and binding options to determine the trim size of the book you'll be creating. Click on the product to get all the products information, and begin setting up your document using the following steps:
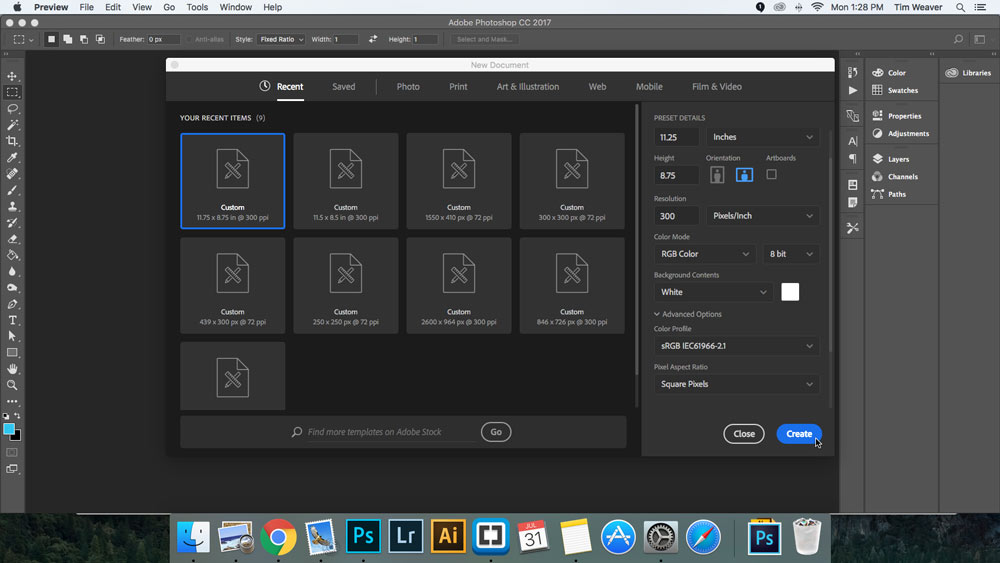
1. In Photoshop select File > New
- Feel free to name your document as you please
- Change your units measurements to inches
- Input the dimensions based on the sizes of the image book you’d like to createplus .25". (For example, if you're creating an 8.5x11", set the width to 8.75" and the height to 11.25")
- Set your resolution to 300 pixels/inches or higher
- Set your color mode to RGB
- Under Advanced Settings; Set Color Profile to sRGB, and Pixel Aspect Ratio to Square Pixels > Select OK
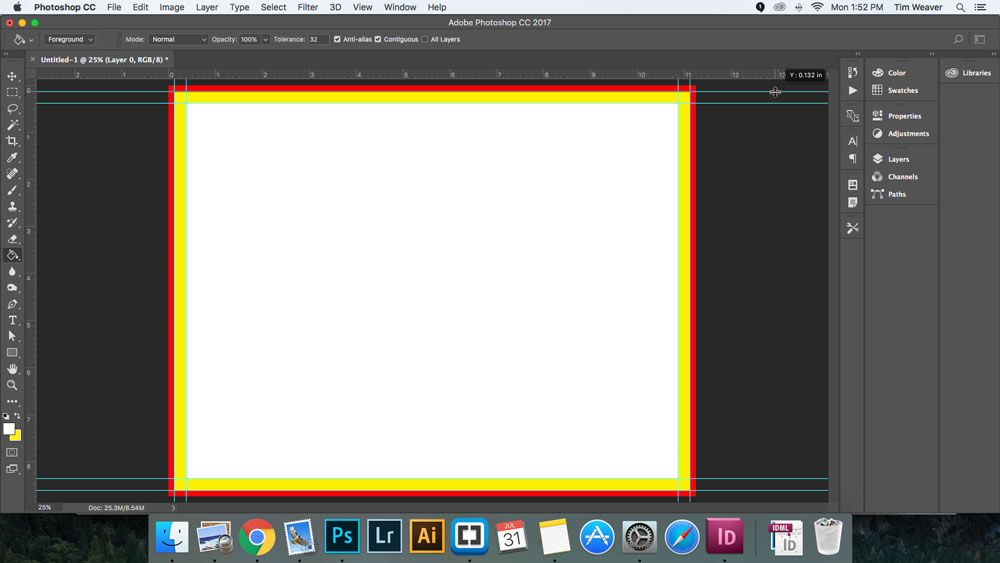
2. In the top menu select View > Select Ruler (keyboard shortcut; cmd + R) *Make sure your rulers are checked on
- Drag imagery and text to your file, and arrange as you please.
- From the rulers select, hold, and drag your new guide to .125 inches, release once you've made your mark at .125 inches from the edge of the document. Repeat on all 4 sides. This is the bleed zone (to the left, the area in red). All full page elements (such as images, backgrounds, etc.) should be extended all the way to this line. If content is not extended to this line, your pages may have white slivers when printed.
- Repeat this same process, but this time it will be .375 inches from the edge of the document. This is the crop zone (area in yellow to the left). This is where your pages will be trimmed to size. Some shifting may occur during production, so keep all important content within the "safe Zone".
- All important content should be kept within the safe zone (area in white to the left). Anything ouside this zone is at risk of being too close to the edge or cropped off.
- Drag imagery and text to your file, and arrange as you please.
Step B: Saving pages as JPG's
Saving Files Option 1
Saving your project as JPG’s, Build book on PrestoPhoto
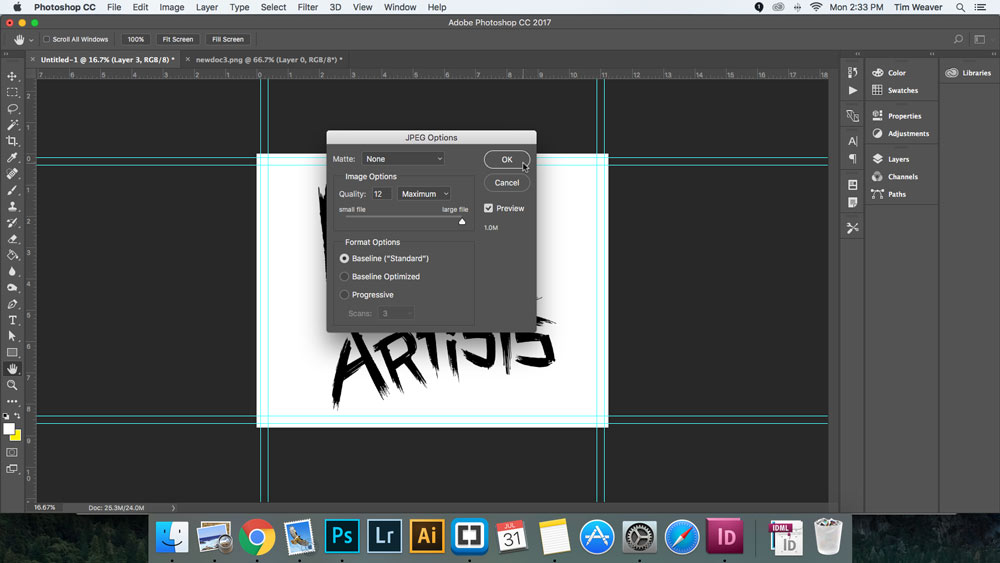
3. In the top menu Select File > Save as..
- Select where you’d like your file to save (ie. Desktop)
- Under the Format dropdown menu change your file to JPG, and select Save
- Under JPG Options, Set your image quality to "Maximum" > Select OK
- Once all files are saved we suggest that you either zip the file
- Once the gallery is uploaded you can then lay the images onto pages using the Book Designer Book Designer screencast Or you can use the Book Machine
- Prepare pages for the left and right facing pages. With every book on PrestoPhoto, page 1 will be a right facing page, with the exception of the Seamless Layflat. If you are creating the book with the intention of the pagination flowing as spreads, then make sure you create page 1 as a leading page or an introduction page - begin pages that will flow as spreads at page 2.
- Create all pages - We suggest saving the original PSD file for every page.
Step B: Save Individual Pdf Pages
Saving Files Option 2
Saving your Project as a Print Ready PDF using Acrobat Pro
- Click hot keys “command + r” to clear the rulers.
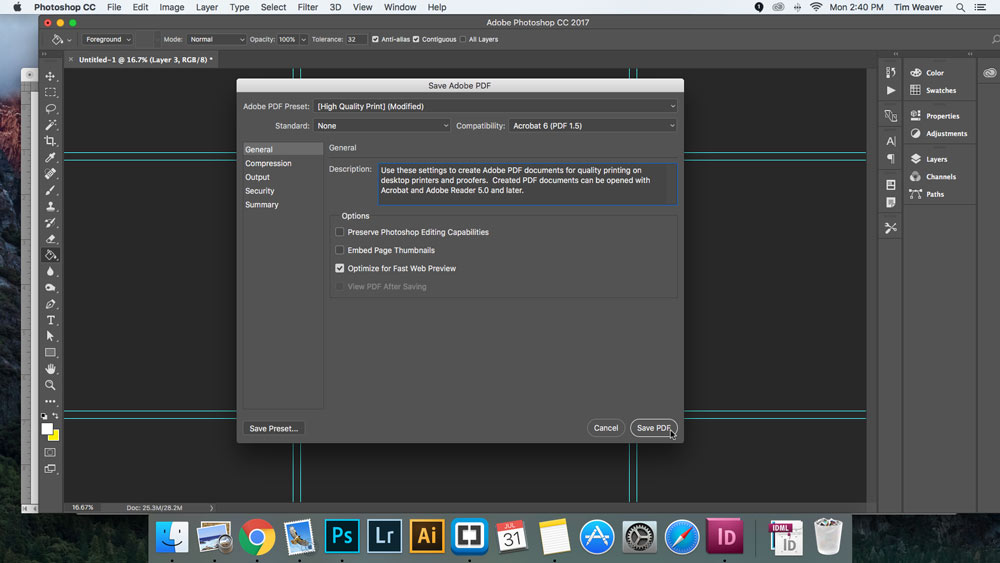
- Click “File” -> “Save As” menu to save as Photoshop PDF (choose Photoshop PDF in the Format pop-up in the Save dialog)
- You have a lot of control of the details of how a PDF is saved. The first step is the settings in the Save dialog itself.
- Layers should be on
- Embed Profile should be on: All the image layers will be collapsed into a single image layer. But text and vector objects will be preserved.
- Next you'll get the PDF settings dialog (this is after the Save dialog and before the file is actually saved).
- Create a preset with Compatibility set to Acrobat 6 (PDF 1.5),
- Preserve Photoshop Editing Capabilities OFF,
- Compression set to Maximum quality JPEG, and
- Convert 16-bit to 8-bit
- All security settings should be off
- Down-sampling should be to 300dpi
- Save
- Once all files are saved place them into their own folder.
Optional Step for speeding things up using a Droplet if desired
Because you need to do Step B for each page, and each time you make a change, it helps to have a Photoshop Droplet to do it for you.
- First make a New Action using the Actions palette from the Windows menu
- Record all the parts of Step B (from conversion to sRGB to saving as PDF) as an Action that saves the file in place, but with the .pdf extension.
- Then use “File” -> “Automate” -> “Create Droplet” to make a Droplet that executes the Action you just made.
When you have all your Photoshop files ready, select them all and drag them onto the Droplet. This will open Photoshop and save each file as a PDF.
Once all files are saved place them into their own folder.
Step C: Combine All The Pdf Pages Into A Single Document
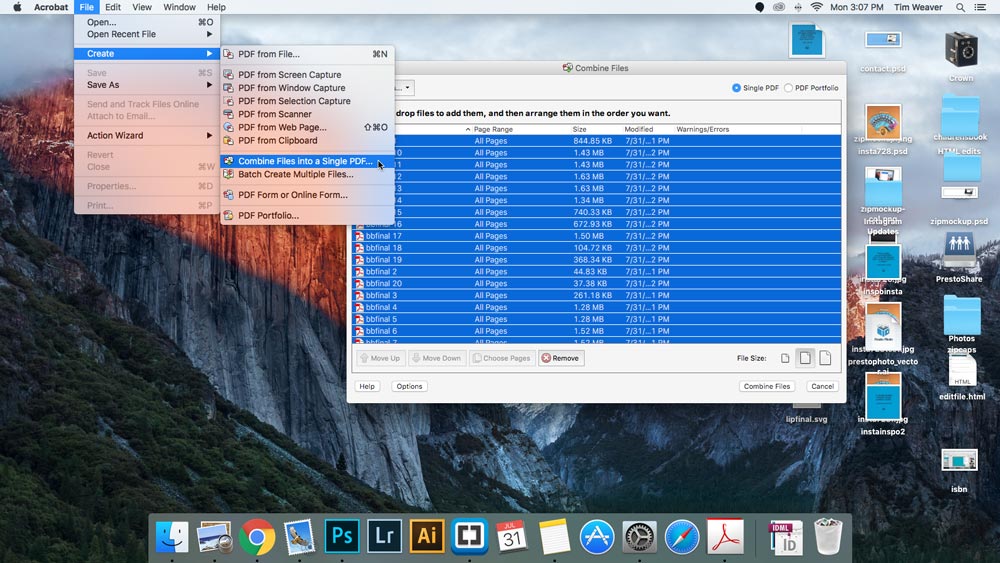
- Launch Acrobat Pro
- Select “File” -> “Create” -> “Combine Files into a Single PDF” You'll want a Single PDF, NOT a PDF Portfolio
- In the Combine Files Dialog, click the “Add Files” button and add all your PDF pages. (You can do this in a single step by using shift-click to select all the files at once in the File Open Dialog)
- Use the Options button to turn all the Options on and set the File Size to the largest size
- When you click the “Combine Files” button it will create a file called Binder.pdf in the folder where your PDF files are Binder.pdf is the first complete file of your book with all the inside pages
Step D: Prepare Your PDF
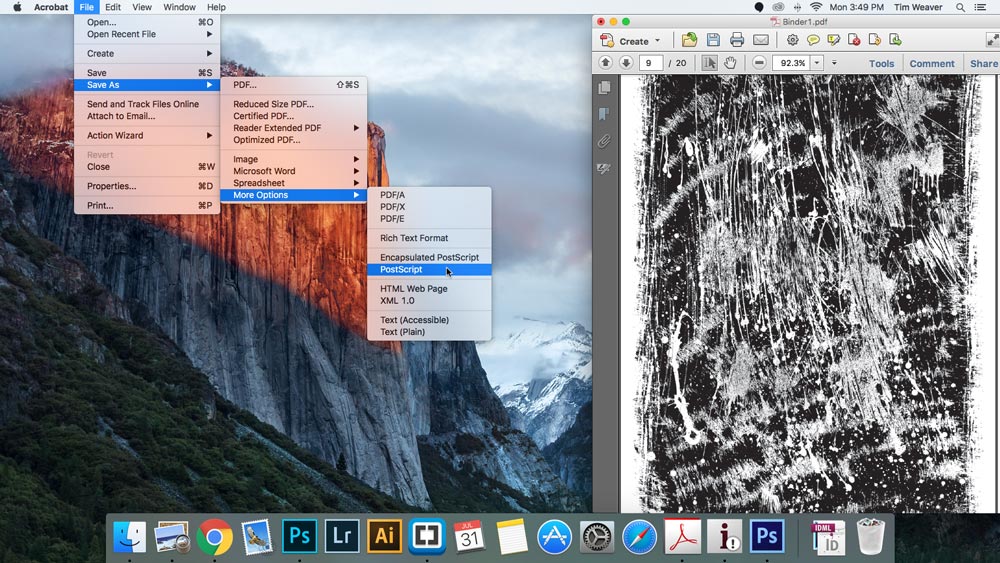
- First you want use Acrobat to save your Binder.pdf as Postscript. You do this in Acrobat Pro using “File” -> “Save As” -> "More Options" -> "Postscript"
- Set the file name to something descriptive.
- Set the Format to Postscript.
- Set the Postscript Settings to the Default for Device Independent.
- Now save your file next to Binder.pdf. It's important to use a new name, not 'Binder' so you don't write over Binder.pdf when you turn your .ps file back to a .pdf.
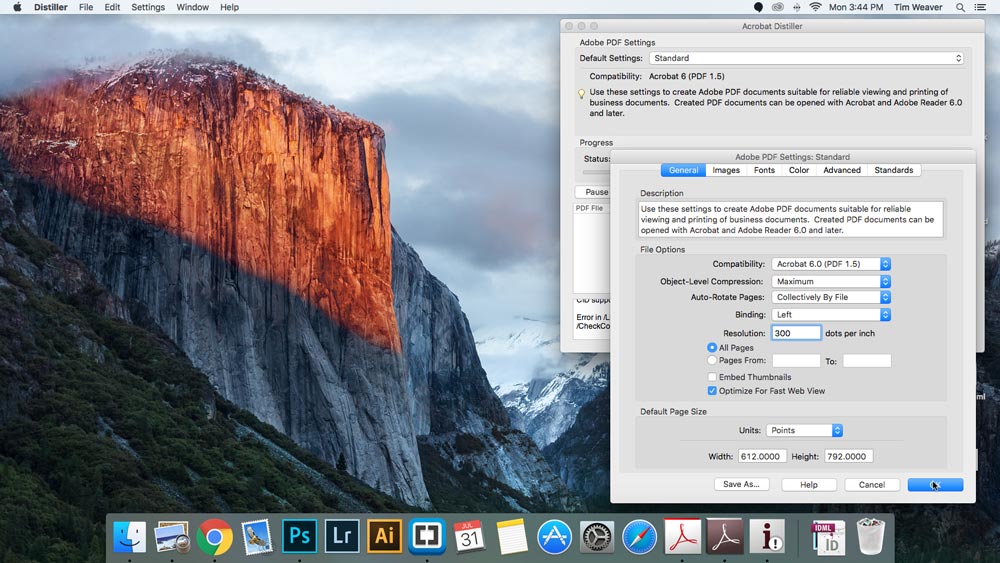
- Now open Acrobat Distiller.
- You'll want a preset for using this website. You make this using “Settings” -> “Edit Adobe PDF Settings”
- In the “General” Tab, set Compatibility to “Acrobat 6 (PDF 1.5).”
- In the “Images” tab set Down-sampling to “300dpi” so you don't reduce the quality of your images.
- Set the Compression to “JPEG”
- Set the Quality to “Maximum.”
- In the Fonts tab Embed All Fonts, but you can Subset when the percentage of characters used is under 100% because this will include each font only once, so you won't get multiple subsets of the same font.
- In the Color tab you want Settings File to be “None”, and Color Management to Leave Colors Unchanged and Preserve Rendering Intent. This will get you the best color rendering. You don't need any of the settings in the Advanced or Standards tabs.
- Now Save this preset with a new name and then drag your .ps file onto Acrobat Distiller. This will create a new PDF that will be in your folder next to your .ps file.
- To check that this file is ready, open it in Acrobat and use the “Advanced” -> “Preflight tool”.
- In the Preflight dialog, select “Digital printing (color)” and Analyze the file. If you see a green check mark and the words 'No Problems Found' your file is ready.
Step E: Making Your Cover
For best results, your cover should be a separate file.
- The covers should be saved out as 300 dpi sRGB JPEG files. All covers are subject to scaling or repositioning (depending on binding type), therefore all covers are rasterized to a common RGB jpeg format prior to printing.
- For a professional look, avoid spine text in your images. The software accurately places spine text, and adjusts based on the binding type (hardcovers have wider spines for example). You can enter the spine text in Step 2 / The Cover Step.
View screencast for help using Step 2 / The Cover Step
Step F: Upload
You have 3 options for uploading your Print Ready PDF to PrestoPhoto.
- Standard PDF Wizard For help review: Standard PDF Wizard screencast
- FTP For help review: FTP help page
- Or you can click here to see how to upload via DropBox
Comments
Pages... single or double?
1. The layflat book says there is a 200 page max. What is considered a "page" is it double sided or single sided? This will determine if I need to cut some photos out of my book or not.
2. When I make my pdf's to upload, do I make it so one document has 2 pages that are going to be side by side? So a 17 x 11? My book is going to be vertical (portrait) orientation. Or is "one page" 8.5 x 11. I have some panoramas so if it's 8.5 x 11 I'm not quite sure how to spread it over two documents.
I hope my questions made sense!
Thanks for your help!
Michelle
Re: Photoshop Expressions 10
Thank you for your question. As long as the fonts look like you want them to in the preview, then you will be all set. Hope this helps!
Warm regards,
Meghan
support@prestophoto.com
Photoshop Expressions 10
to low dpi
Re: to low dpi
Greetings from PrestoPhoto and thanks for your interest.
Do you have multiple PDFs or one PDF? We prefer one :)
PrestoPhoto support
font and sRGB
And its not really clear, should i convert to sRGB or sRGB IEC61966-2.1 ?
Re: font and sRGB
Here's alink to our PDF Specs page that should help :)
http://www.prestophoto.com/wiki/PDF+Specs
If you have anymore questions please let us know!
PrestoPhoto support
Full Bleed Panorama on Two Facing Pages
Example
12.5"x20" full bleed Panorama for a 12.5 x 10" Landscape Wire O Bound Flat Hardcover Book
I would like to split down the middle into two equal images. Should these be resampled in order to create 12.75"x10.25" images? If so, then would I loose the central 1/4" of the panorama due to trim?
Is it possible to simply place the original 12.5"x10" (or perhaps the resampled larger size) images toward the gutter of the facing pages and specify the trimming to occur only on the outside edge and not the gutter side?
If that is not possible, could one place the images only 1/16" from the gutter, leaving some 1/16" blank in the gutter and then the 1/8" trim all around would remove only 1/16" of each side of the image?
Hoping you can give me some advice without needing to do a test run.
Thanks in advance.
Re: Full Bleed Panorama on Two Facing Pages
Two-page spreads are really a matter of personal preference, and the image at hand. Some images are very unsettling with overlap, but often that can't be avoided (think group shots of people). However, the Ventura book has essentially no overlap, and it looks great. Keep in mind the holes of the wire-o spine are a good 1/4" into the interior of the book, however you can see through them. I would have at least 1/4" overlap on each page (1/8" will get trimmed away), and probably a bit more.
Here is a page which might help: http://www.prestophoto.com/photos/gallery/11323