
Uploading
FAQ about uploading files
Uploading
Uploading

What file format do you accept?
We accept nearly all major image file formats. The three we see most often are JPEG, PNG, and GIF. We recommended you upload JPEGs for the best quality with the least amount of quota usage. JPEGs will also upload more quickly and are less likely to produce errors during an upload (because you are transferring fewer bytes).
A JPEG file is compressed, thus a much smaller file size for upload. There is a tiny loss in definition, but at the sizes most photos are taken at these days, this loss is quite small.
A PNG file preserves your photo or image more completely than other compression formats, but the file is likely to be substantially larger than a JPEG and thus will take longer to upload.
A GIF file works best for simple line art, logos and icons. The GIF format only supports 256 colors; it is not recommended for photographs or any artwork where resolution is important.
How should I save my images prior to uploading?
Regardless of the format you use always remember to
- Leave the colorspace (RGB/CMYK) unchanged. - any color space conversion can cause washed-out or inaccurate color reproduction.
- For images with text, either fully embed your fonts or (in advanced programs like Adobe Illustrator) use the "Convert text to curves" function.
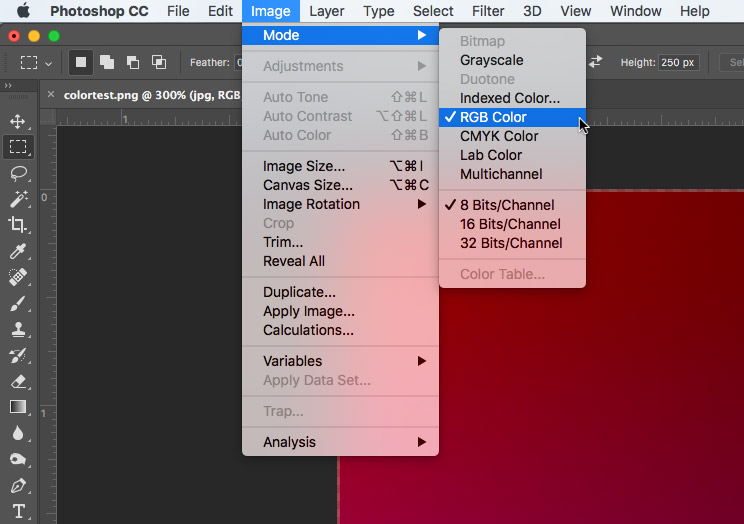
Should I save my images as RGB or CMYK?
Don't convert your images from CMYK to RGB as it will cause your images to print in a different hue then you expect.
- For a color book your images should be in the original colorspace. If it was created in RGB, DO NOT convert to CMYK and vice versa.
- For a black & white book set each black and white image to greyscale.
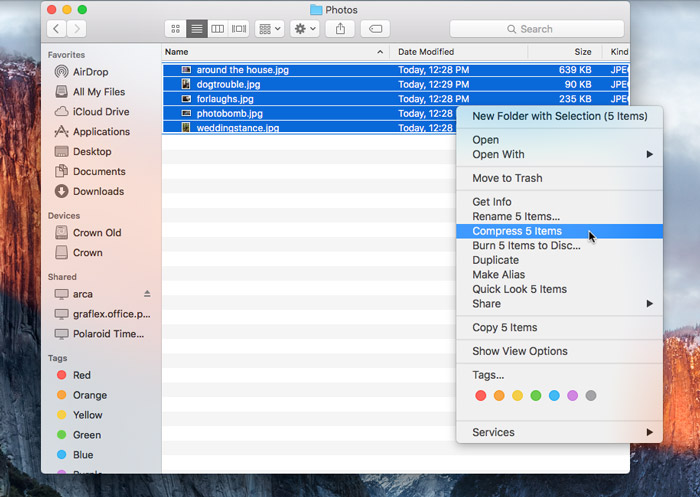
Can I batch upload my images?
Yes, you can upload more than one image at a time -- you have a couple of options. You can repeatedly use the same file browse button and each time you select a new file, it will be appended to the list of files to upload. Unfortunately, it is a limitation of browsers that you cannot shift-click multiple files to upload.
The second option we highly recommend is to zip up a folder of images on your hard drive and upload the single zip file. We will auto extract the zip file into a gallery, and even any sub directories will be converted to sub galleries. All you need to do is zip the images into a folder and upload that zipped file. Once uploaded, we decompress the separate out the images for you. Read more about uploading zipped files and directories.

When I see images in the book preview, I noticed some reddish tinge on people's faces (35mm slides scanned and sharpened in Photoshop). Is this due to the heavy compression of the original images or do I have a over-sharpening problem here?
If you experience this situation you my want to work with the Photoshop Levels (or Auto Levels) for color adjustment if you haven't already. However, your high contrast might look very nice when printed, particularly on our digital silk paper which is available as a purchase time option when you add your product to your cart. NOTE: The image color is not altered in any way while building or printing the PDF,however, there is a difference in color from the PC screen to ink on paper.
Will the colors be the same as I see on my computer?
The colors will mostly likely be darker than what you see on your computer. Since your monitor is back lit, the colors are brighter than they will be on a flat printed surface.
I noticed some streaks in my images that have a lot of blue, what should I do?
Avoid very light color builds of less than 20%. Below 20% tint variation is very difficult to consistently control. Typically, you will see this with images that have a lot of sky or lots of water.

Should I allow for clipping and gutter for my images?
No need to worry about clipping and gutters. We automatically adjust images to full bleed as long as the images have the same aspect ratio of the paper. We increase the size of the PDF to include an 1/8" trim space. In short, make the images the size you wish and we will adjust so that they are set up properly for the trim.
I want an 8.5"x11" book, should I create an 8.75"x11.25" x 300 DPI jpeg file for full bleed? (And not choose "full bleed option" when I create a photo book ?) Or should I create 8.5"x11" x 300 DPI jpeg and select "full bleed" option?
We recommend creating your jpeg at 300 DPI and 8.75x11.25. If you don't select full bleed then you will see the extra 1/4 inch. If you select full bleed the outer 1/4" will be trimmed off.