
Apple Photo Book Help
Print Apple iPhoto, Photos or Aperture Book with PrestoPhoto!
Looking for Apple Photo Book printing alternatives? You've come to the right place. At Presto Photo we match the printing specifications used by Apple and the provide the familiar templates so you get the high quality books you have always loved. And, we have lower prices to boot! We're here when you're ready to create your apple photo book!
macOS 10.15 "Catalina" Update Instructions
Before updating to macOS 10.15 "Catalina", please check out our App Upgrade page for information about PrestoPhoto App Version 2.2.0.
This update also no longer supports Aperture and iPhoto, so by updating you will lose access to past projects. We suggest you backup all of your photo book projects before updating.
How Do You Print an Apple Photo Book?
Our Photo Book Printing meets Apple's Photo Books specifications in nearly every way. We have created a product that feels similar to what you love, while also giving you more photo book printing options to pick from than ever before.
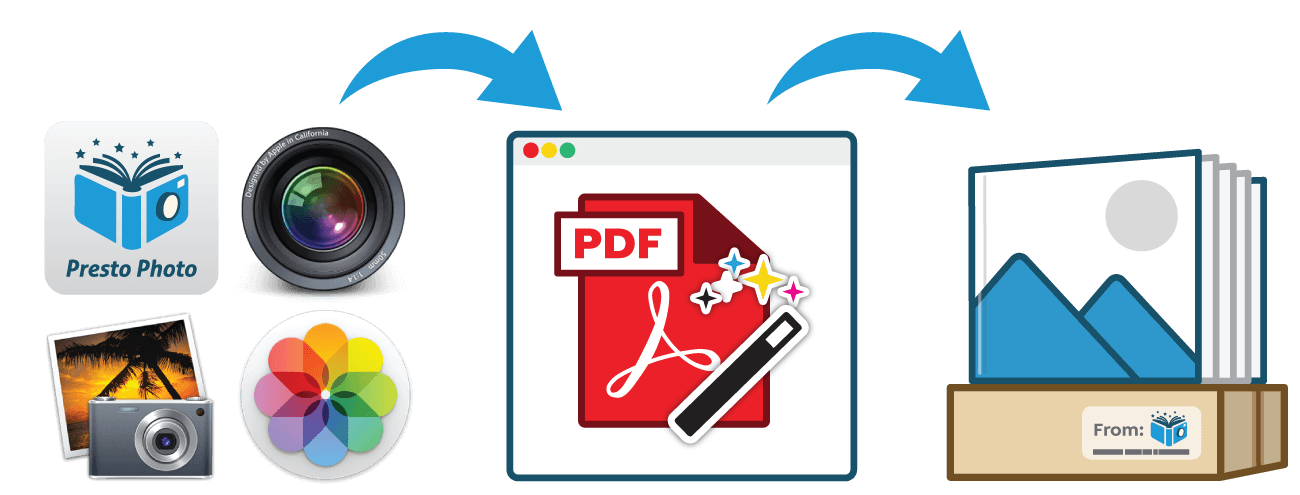
- PDF Exports from Photos, Aperture®, iPhoto®, or the Presto Photo App
- Upload your book to Presto Photo
- Pick your Photo Book Options and Order!
Presto Photo can print Apple Photo Books using a wide variety of file types.
| Presto Photo | Apple | |
|---|---|---|
Print PDF Photo Books? |
Yes | No |
Print Aperture Photo Books? |
Yes | No |
Print iPhoto Photo Books? |
Yes | No |
Print Apple Photos Photo Books? |
Yes | No |
Where are our Apple Photo Books Printed?
Presto Photo has partnered with a large printing partner to produce high quality books the are very similar to the Apple style photo books. If you're looking for the best Apple Photo Book printing alternative, we got you covered, front to back.
Do you have Apple Photo Book templates?
Presto Photo has all of your favorite templates from Apple Photos, iPhoto, Aperture and more! We have built an extensive template collection from your favorite Apple applications, so you can continue to create Apple Photo Books with the same style and design.


Supported Apple Programs
- Photos 1
- Photos 2
- Photos 3
- Photos 4
- Aperture 3
- iPhoto '06 (6.0)
- iPhoto '08 (7.0)
- iPhoto '09 (8.0)
- iPhoto '11 (9.0)
Quick Guides for Photos, iPhoto®, and Aperture®
Apple has discontinued their own printing, however PrestoPhoto can happily still print for these programs. Create your custom photo book in any program and enjoy PrestoPhoto's size options and great everyday pricing. It is easy, and only takes a few steps!
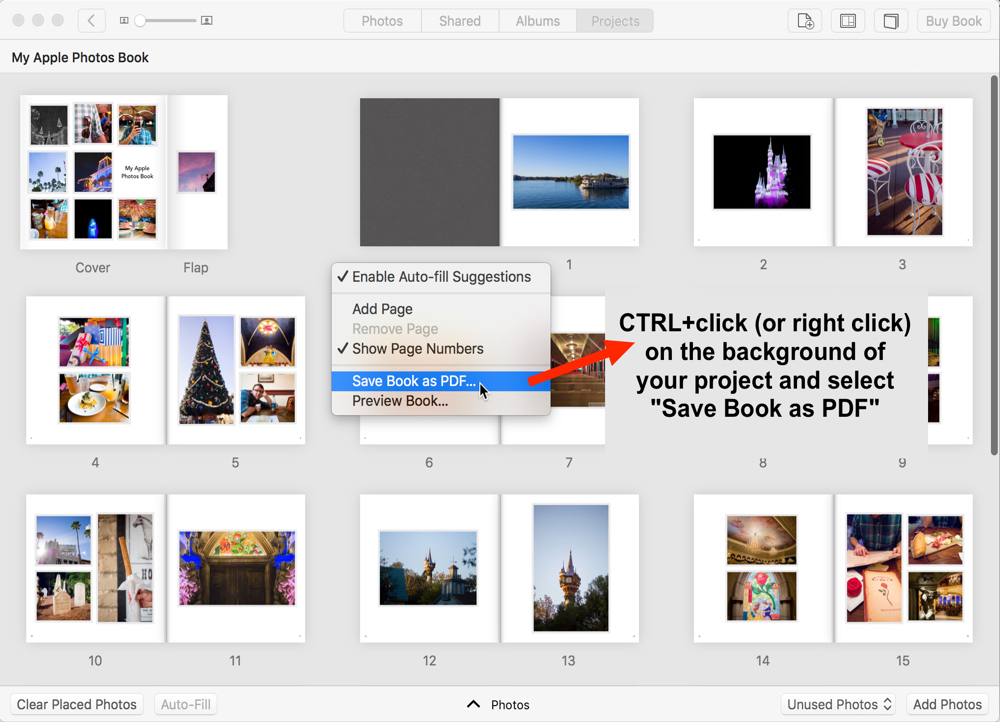
Photos
- Complete your book in Photos
- Inside the project, CTRL+CLICK (or right-click) on the gray window background to and select Save as PDF...
- Upload the PDF to PrestoPhoto
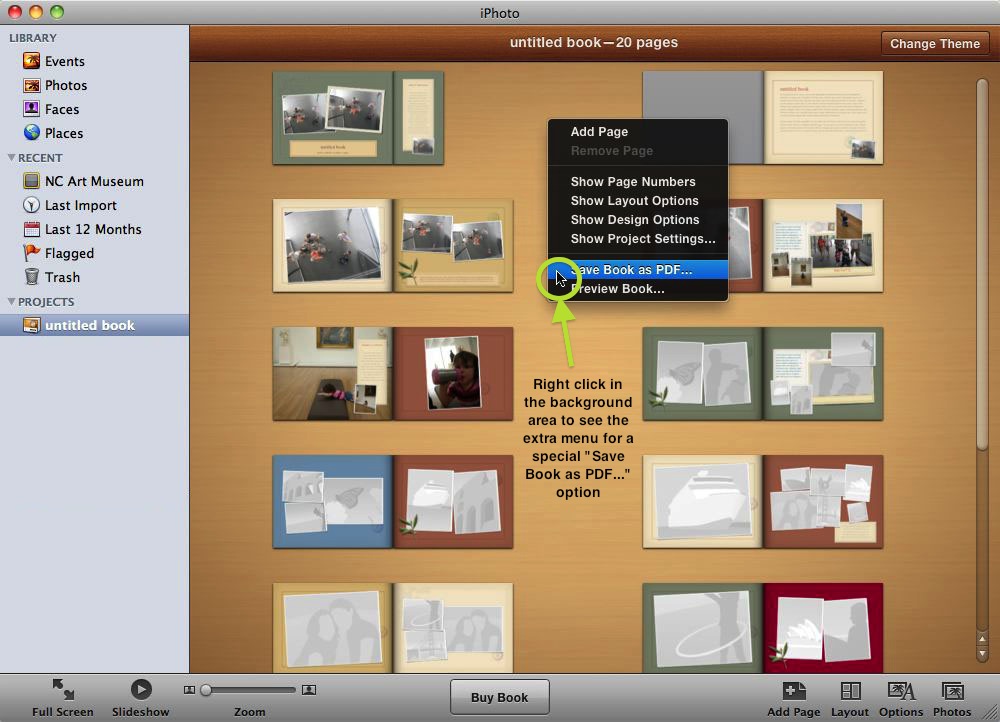
iPhoto®
- Complete your book in iPhoto
- Save your book as a Special Book PDF, CTRL+CLICK (or right-click) on iPhoto window background and select Save book as PDF...
- Upload the PDF to PrestoPhoto
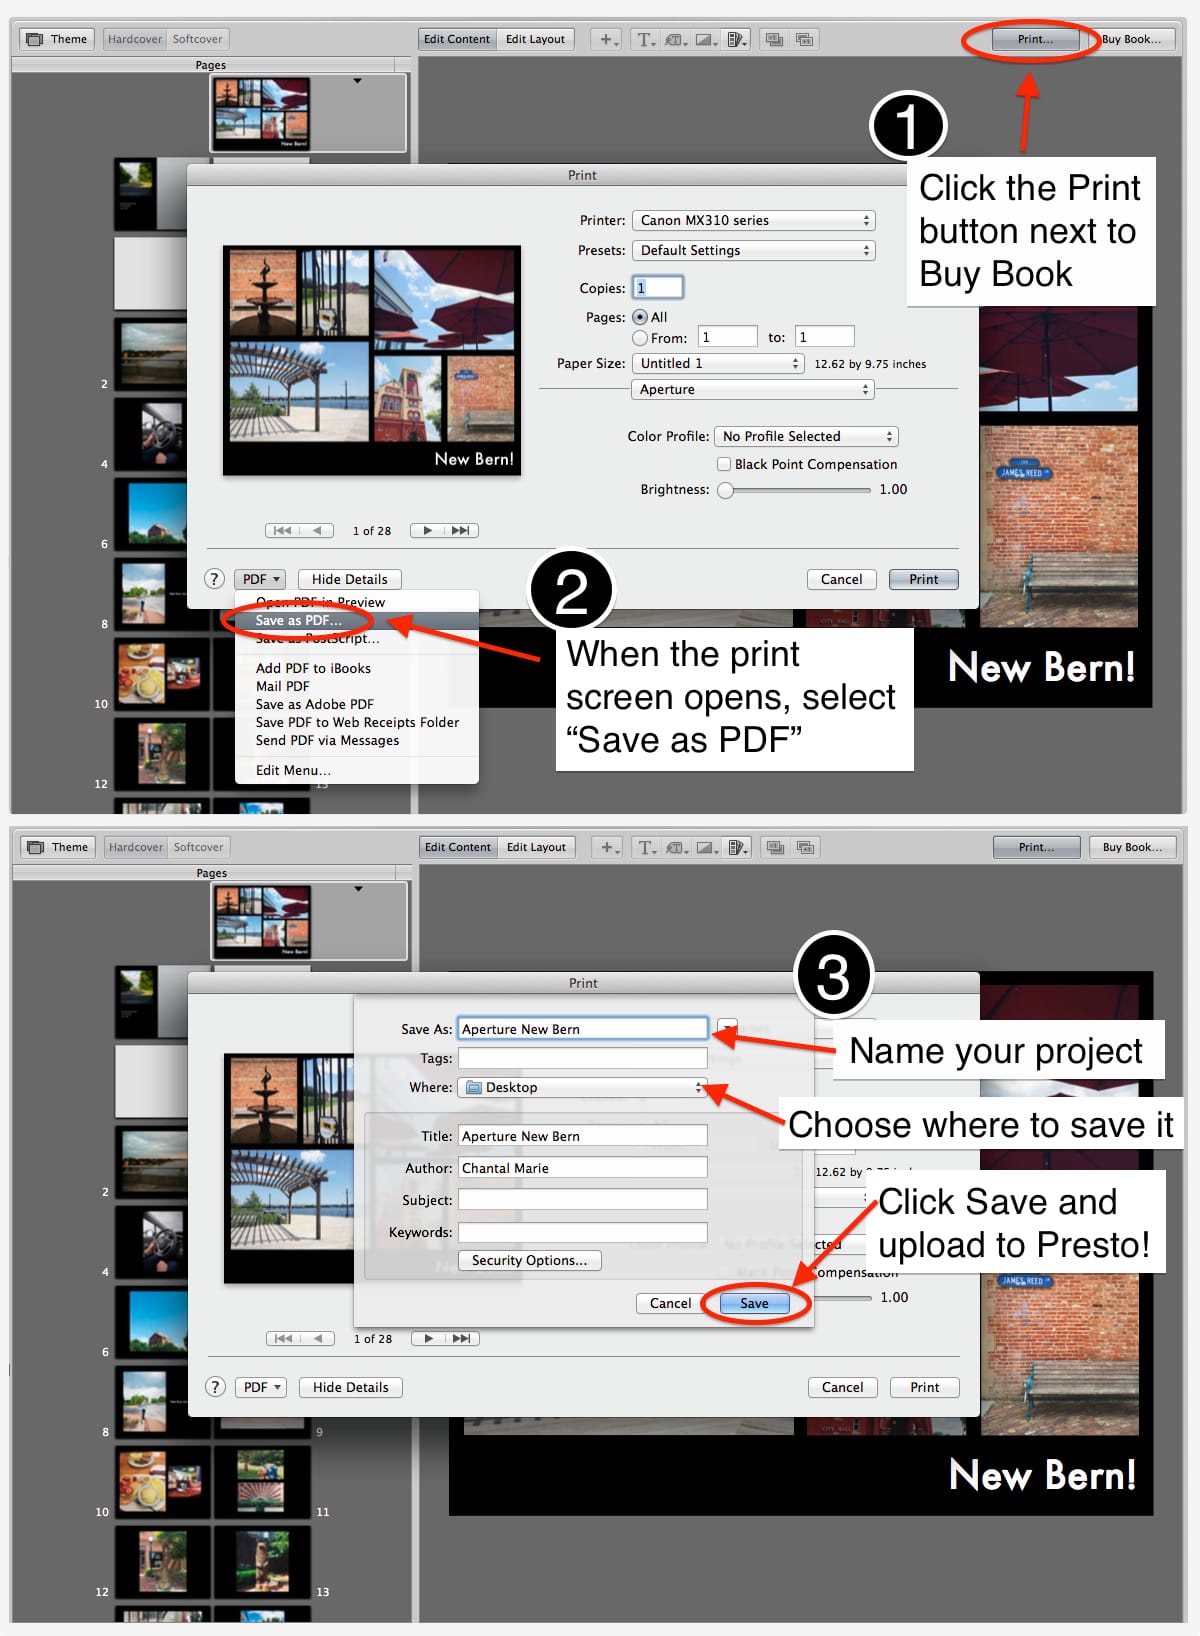
Aperture®
- Complete your book in Aperture
- Select the Print button from the upper right of the page >> Choose Save as PDF from the drop down menu at the bottom left >> Name your file and click Save
- Upload the PDF to PrestoPhoto
Apple Photo Book FAQs
Think of us as fraternal twins with Apple; our slogan is “Compatible, not identical”. While we print very similarly to Apple, we are a bit different since we’re not the same company. We have a slightly more aggressive crop line and there can always be some quality differences depending on personal preference. However, we take pride in our product and offermany more options for purchase at a much lower cost for you!
Note: We highly recommend that everyone checks out our page on making your images Presto ready, and the best they can be. This will help with (what could be) much heartbreak!
Currently our 11"x8.5" and 13"x10" hardcovers can have dust jackets, though by default our books do not come with a dust jacket. For these sizes, select the dust jacket option that is visible while checking out on the Buy Now page.
Of course you can. On the Buy Now page for your book, select the Layout button above the cover image. When this loads, check the box that says Show Crop Guides and take these guides into account when you are visualizing how your book will be printed. Anything that shows up under this guide has a chance of getting cropped off (cut off) during the production of your book. If there is anything important in this area, especially text, you want to fix it and reupload or be prepared for this element to be cropped.
In some book creation programs, the spine text you have input will be imported with the PDF file upload, though Apple with Photos some versions do not include the full cover when you save out your PDF file for upload. This means they include the front and back cover along with your dust jacket flaps, but not the actual spine of the book. We have no control over spine text when uploading a Apple Photos PDF file since it is not included with the file.
There is a way though: if your spine text is not displayed in your Apple PDF, you can insert your own spine text when you upload it to our website. After you have uploaded the book for Step 1:
- Within Step 2 find the area labeled Spine Text below the cover preview and Cover Text & Color section
- Enter the text you desire in the Top Spine Text, Center Spine Text, or Bottom Spine Text area
- After you've entered the text, click Update Cover at the bottom of the page for a preview of your spine text
- If you are fine with the results, go ahead and place your order. If not, edit the spine text and position until you reach your desired result. If you need to change the color of the spine text, in the box above labeled Cover Text & Colors has a Spine Text Color option to edit the color of the text, click on the box to the right to bring up the color picker, and when you are done click the Update Cover button at the bottom of the page to see your new preview
For sure! We know some Apple customers like to make their books a little bigger, and we don't want to limit them at 100 pages if you need more. With all of your books created, it's a simple process to combine them together on your own computer with the steps below:
- Create your books following the steps for Photos, Aperture, or iPhoto with each book labeled (for example, Part 1, Part 2, etc)
- Open all parts of your book in Preview
- Turn on the Tumbnail view in each of the Preview windows by clicking View -> Thumbnails
- Select the pages you want to add to the main book from the other PDF (not selecting the cover or dust jacket flaps because those are already in the PDF file) and drag and drop them to the other PDF file
- You now have a book over 100 pages from either Aperture, iPhoto, or Photos, awesome!
Your book looks amazing, but by default text can be too close to the edge of the individual pages or the cover, which could result in that text being trimmed off in the book making process. There is a fix though.
In Apple Aperture:
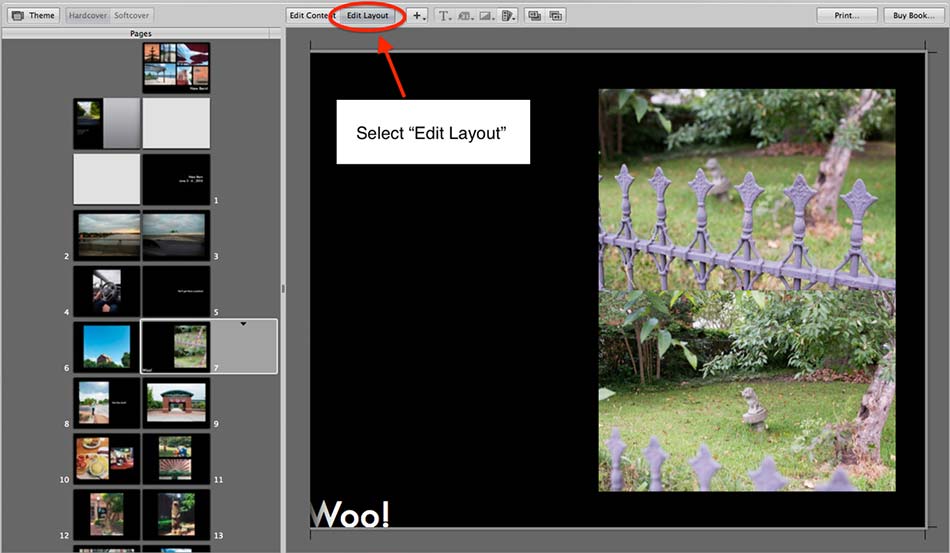
Step 1
Click Edit Layout and select the item you'd like to change
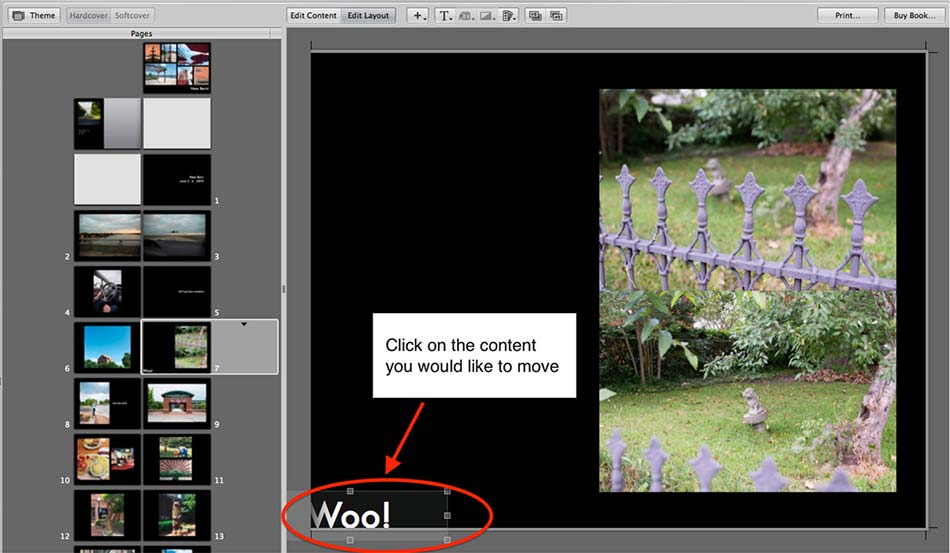
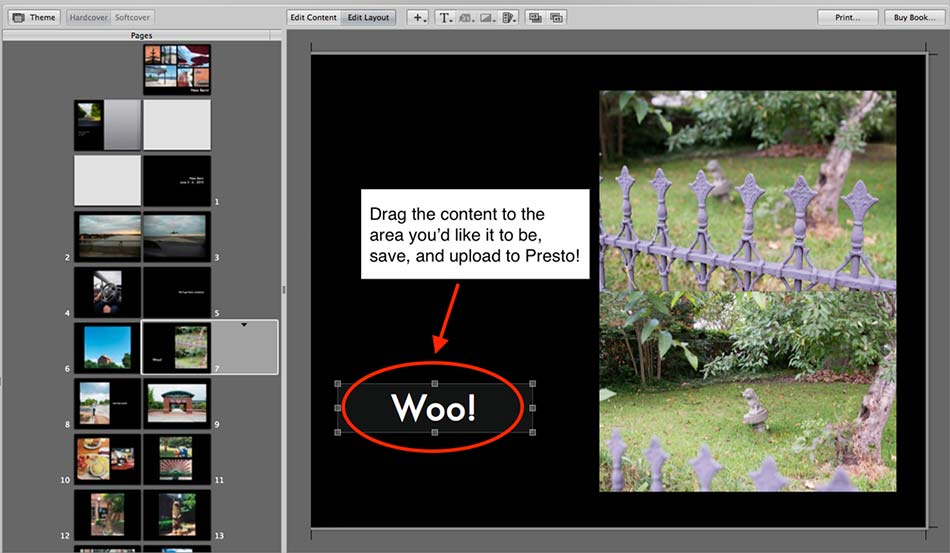
Step 2
Use the square handles to move the text boxes towards the center of the page and adjust the sizing
Step 3
Be sure that your cover and interior pages follow our Crop and Bleed guidelines for optimal results.
For Photos & iPhoto Users: There is less control in these programs over the layout and design of your photo project. If you are showing cropping issues in your layout preview for your book, you can potentially change the theme/template of your book or tweak how the images are laid out for your book. If you have any concerns, please reach out to us once you've uploaded and we will look it over.
Potentially a lot. You could have white borders placed on your interior pages and cover, your dust jacket flaps could print on interior pages, or your order could be delayed by going into our checking process to make sure with you this is what you wanted (if we catch an issue, we like to talk with you first).
Aperture Users: Please make sure to use the instructions for saving your file. Do not use the File->Save as->PDF method as it will give you a PDF file that we cannot print.
Some Aperture sizes can't be saved with the proper steps above because of their settings. We've got two fixes with some step-by-step visual guides to help:
Step 1
Click Print in the upper right corner
Step 2
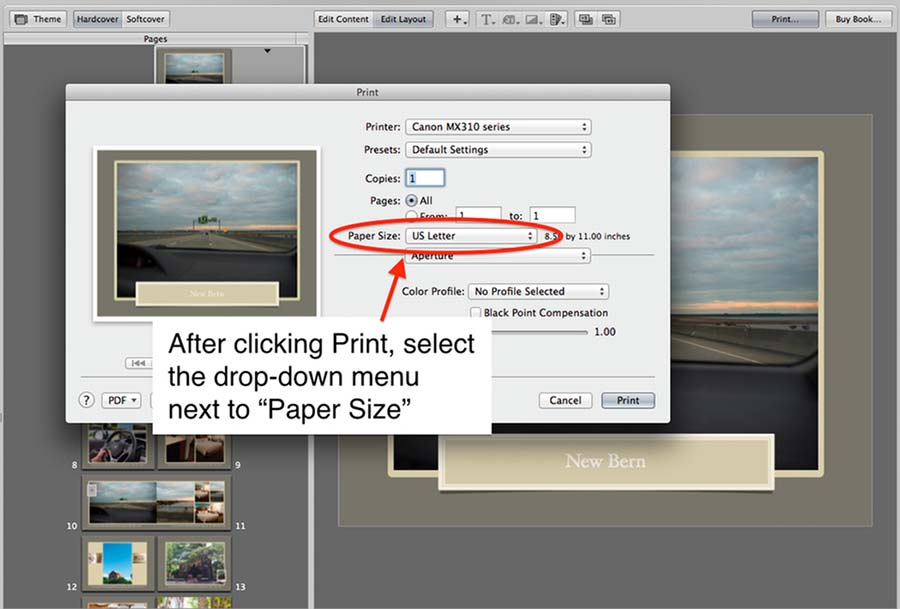
Click the menu next to Paper Size and hover over US Letter
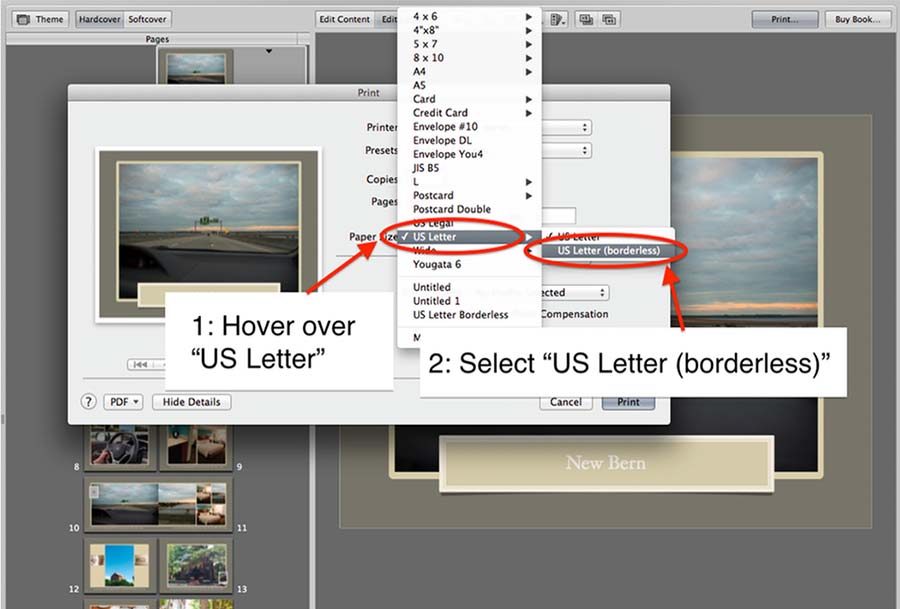
Step 3
Select US Letter Borderless
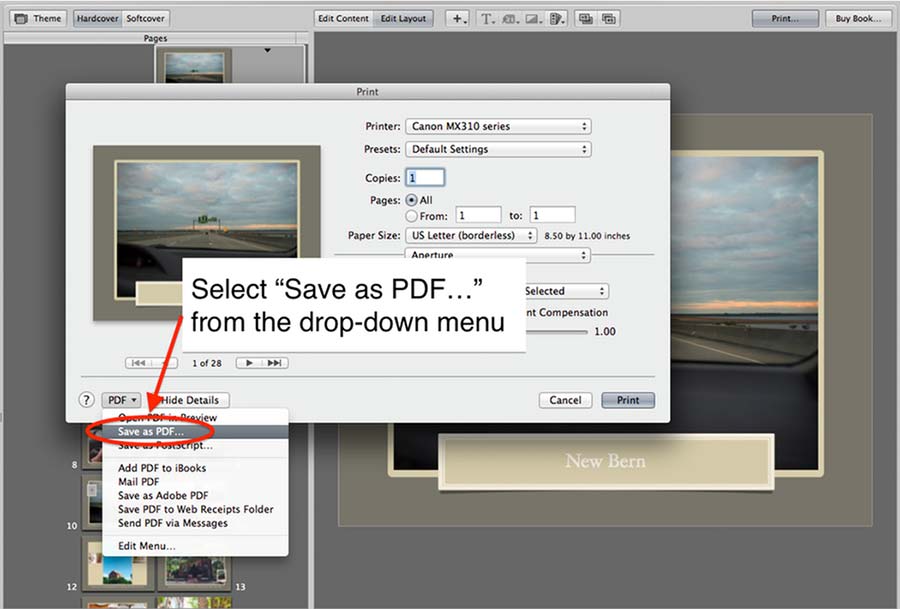
Step 4
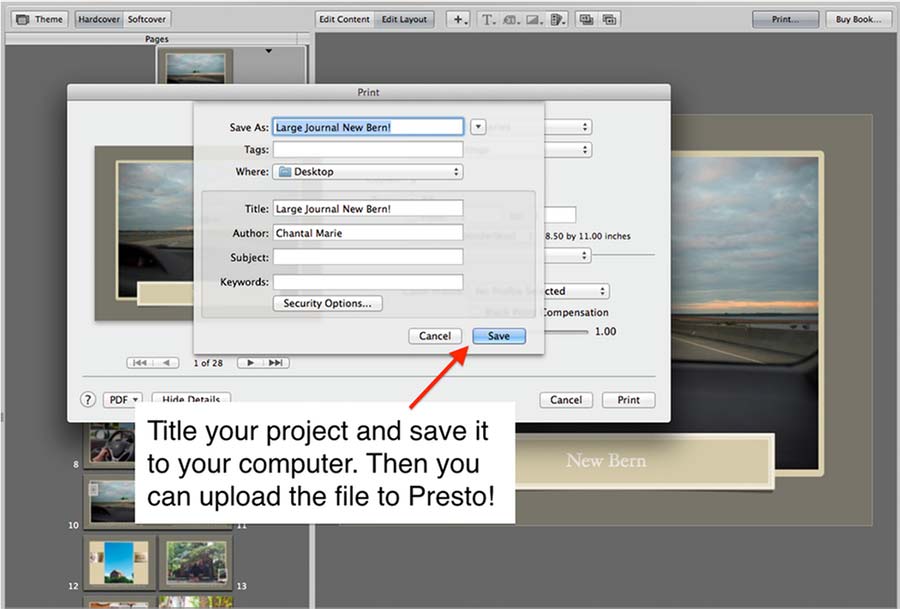
Select PDF and then click Save as PDF. Upload your fixed PDF file over the old version, or as a new project here: Aperture Photo Book Upload
Still having issues? Follow these steps and it should fix your issues!
Step 1
Step 2
Step 3
Step 4
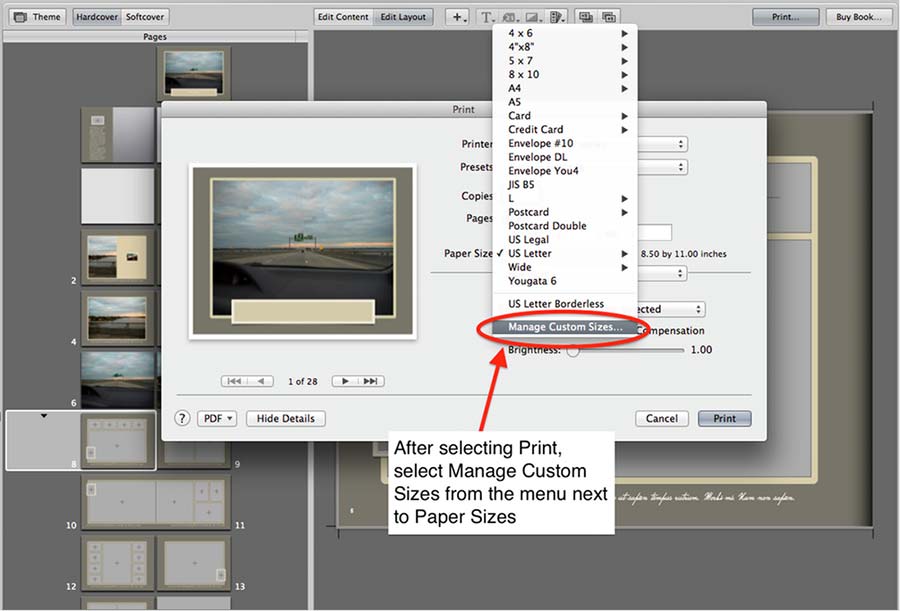
- Click Print in the top right hand corner
- Click the menu next to Paper Size and select "Manage Custom Sizes"
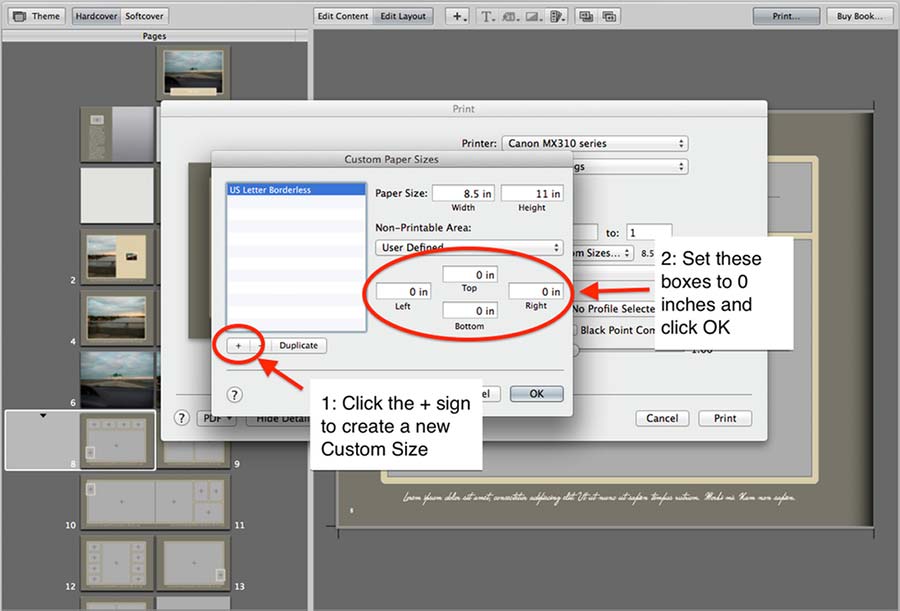
- In the new dialog box, click the + sign
- Under User Defined erase the numbers in all of the four boxes and click OK
- Do not change the page size in this section
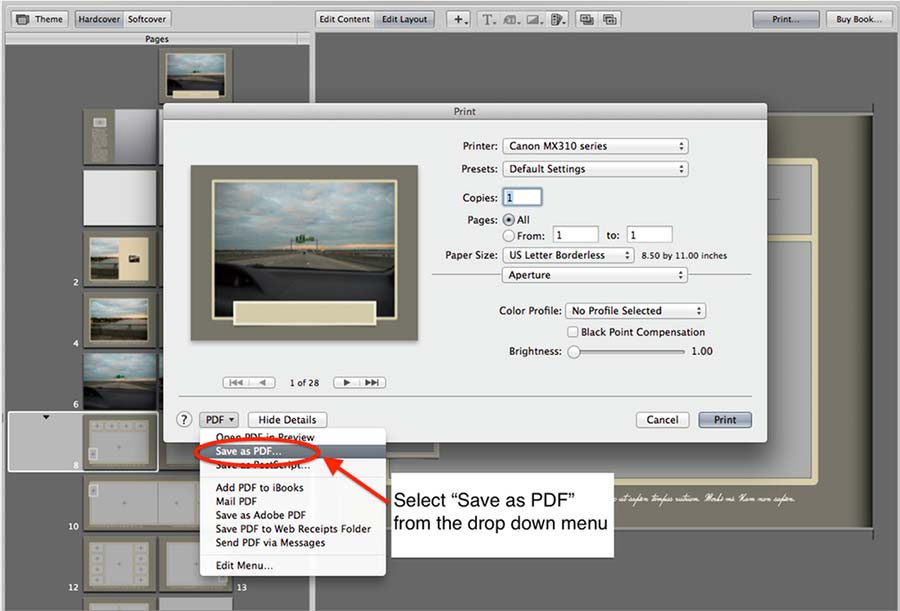
- Select PDF and then click Save as PDF
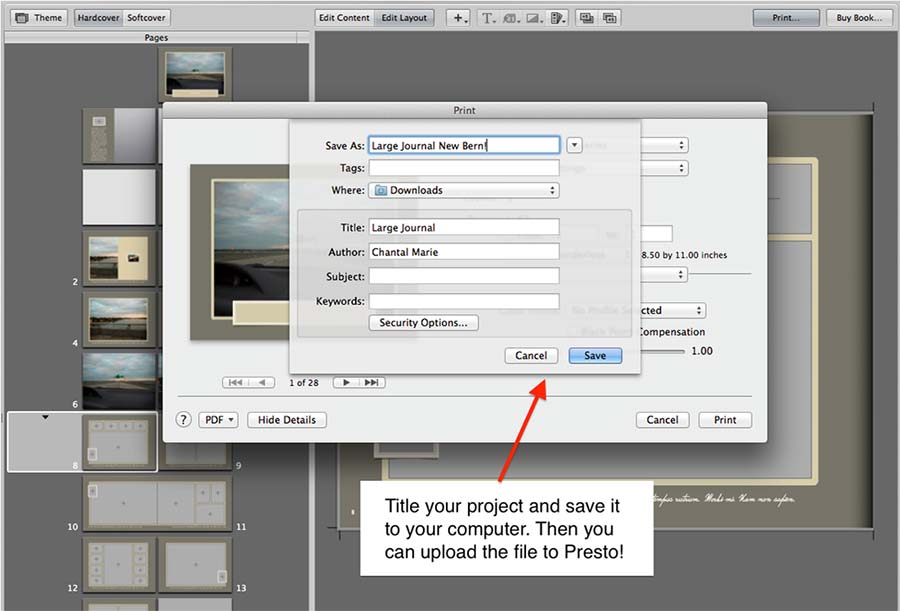
- Upload your fixed PDF file over the old version, or as a new project here: Aperture Photo Book Upload
- Enjoy your borderless ready for print book!
Your book could be saved improperly. Follow our guides for saving out in Photos, Aperture, or iPhoto to print with Presto Photo. If your book is saved with these steps and correctly uploaded, dust jacket flaps shouldn't appear on interior pages of your book. If you've tried the steps above and still can't get those dust jacket flaps in the right place, contact us and we'll see if we can help.
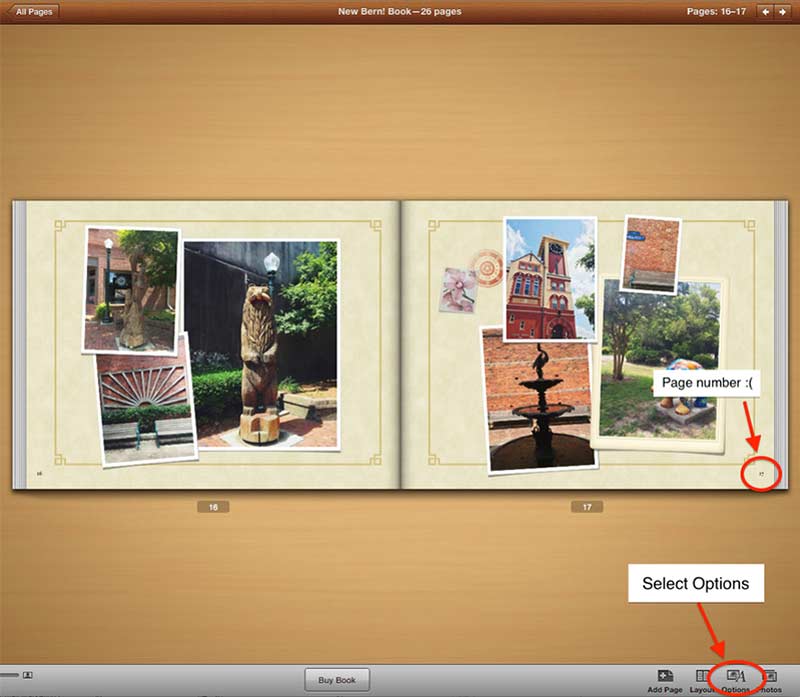
Yes it is. We even recommend it, as page numbers often times are right on the crop guide, meaning they could be partially or completly chopped off during production. We have guides to remove page numbers for each Apple program below:
For Aperture:
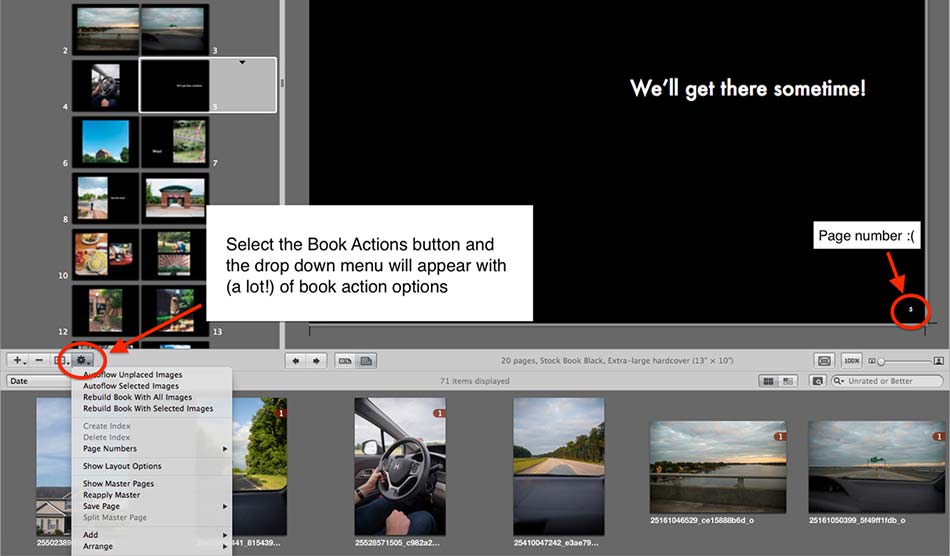
Step 1
With your project open click on Book Actions (the Cog icon beside the +, -, and grid icon, you may have to hold the click for a moment for the drop down menu to show up)
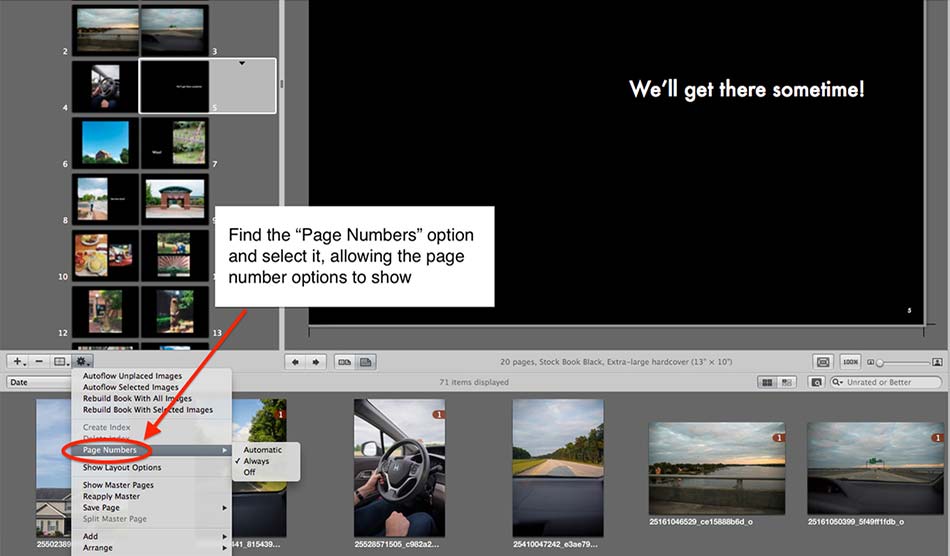
Step 2
Select the Page Numbers options
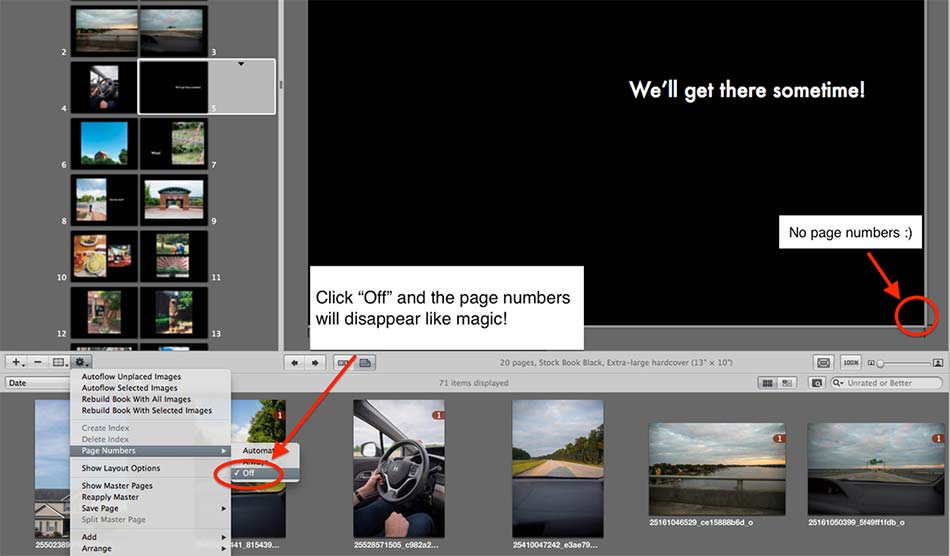
Step 3
Click "Off" to remove page numbers from your project
For iPhoto:
Step 1
With your project open click "Options" at the bottom right
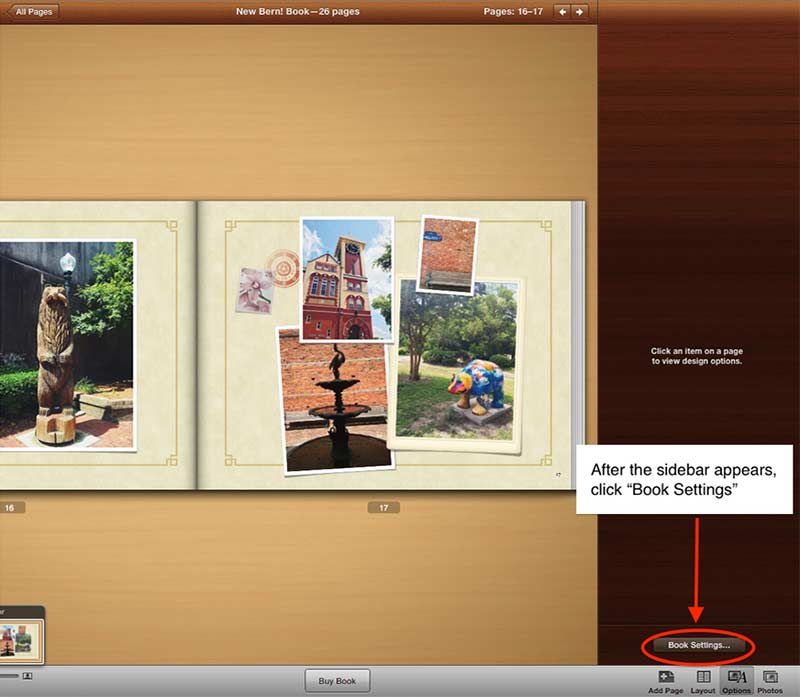
Step 2
Once the sidebar appears, click on "Book Settings"
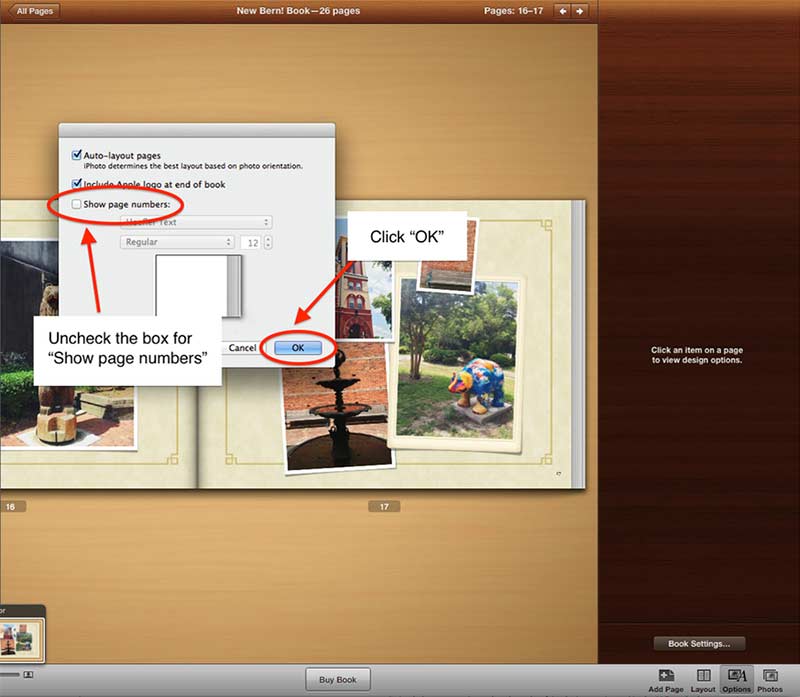
Step 3
Uncheck the box labeled "Show page numbers" and then click "OK".

Step 4
Your page numbers are now gone.
For Photos:
- With your project open hold control on your keyboard and click on the background of the window or Right Click on the background of the window
- Click on Show Page Numbers if it has a check mark beside it
- Page numbers are now turned off for this project
Presto Photo can do that for you! You don't have to recreate your book in a new size, using our Auto-Scale technology, we can print you book in any of the sizes available in the books Buy Now page. For most Apple Photo Books, sizes go from 9"x7" to 14"x11", with many sizes inbetween. We also print Square Apple Photo Books in a couple of extra sizes too.
Getting Started is Easy
PrestoPhoto provides Apple comparable templates to help you create books consistent with what you’ve been making with Apple over the years. Apple iPhoto®, Photos, & Aperture® are registered trademarks of Apple, Inc, registered in the U.S. and other countries.. Our Photo Books are in no way endorsed by Apple Inc, however we have worked hard to make sure they match the look and feel of your existing books.
Comments
is the new Presto MaxOS software a replacement for Aperture
Re: is the new Presto MaxOS software a replacement for Aperture
The only thing we are trying to currently duplicate is the Book Builder, as far as the photo editing and library management, that's all handled via Apple Photos.
In regards to the Catalina update and Aperture support, we can't say 100% for sure that it won't run until it releases, but ever sign points to it not being supported. Only 64 bit software is supposed to be supported from Catalina and going forward. Since Aperture is 32 bit software, unless they change their minds, it most likely will not be supported. We suggest you hold off on updating to Catalina immediately and see what the official word is upon its release.
Warm Regards,
Tim
Problems uploading
I was able to upload the PDF version of my iPhoto book but there is a note that states nothing supports my request. I'm not sure why and what i can do about it.
Re: Problems uploading
It looks like your project has been uploaded as a Photo Album rather than a Photo Book. The Photo Albums are specifically for those creating their projects with 2-page spreads throughout. Project created in Apple iPhoto will need to be uploaded as a Photo Book to ensure they are formatted the way they would have been within the Apple programs!
If you have any other questions, please feel free to reach out via email to support@prestophoto.com
Warm Regards,
MJ
Merging two PDFs
Re: Merging two PDFs
Page cut offs
Re: Page cut offs
Adding pages
Thank you
Chris
Re: Adding pages